What is Webmaster Tools?
Google Webmaster Tools, also known as Google Search Console, is a free service from Google that includes a collection of tools to help monitor and maintain website performance, check index status, and optimize search visibility.
What’s the Difference Between Webmaster Tools and Search Console?
Absolutely nothing! Google Webmaster Tools and Google Search Console are the same thing. Google rebranded from “Webmaster Tools” to “Search Console” in 2015, but old habits die hard, so you’ll probably hear a lot of people using both names interchangeably.
What Does Google Webmaster Tools Do?
Search Console provides some powerful tools that can help diagnose errors and improve both technical and on-page SEO — some example uses include:
- Submit an XML Sitemap
- Create and test robots.txt files
- Request Google to crawl a new or updated page
- Submit your site to Google
- Temporarily hide URLs from search
- Find and fix crawl errors
- Find and fix errors in schema markup
- Link Search Console to Google Analytics or Google Ads
How to Use Webmaster Tools
We’ve compiled a list of the most common questions we get about using Webmaster Tools & Search Console into a full beginner’s guide — from setup to removal!
We’ll also walk you through some of the best features and resources that Search Console has to offer to find and fix technical issues and optimize search visibility for your site. So let’s get started.
How to Set Up Search Console
Adding Your Site to GSC
Note: You can click on all screenshots below to view at a larger size.
Step 1: Log into Webmaster Tools
If you already have Google Analytics or Google Adwords setup for your site, you should log in with the same account details.
Step 2: Enter the URL of your website and click Add a Property
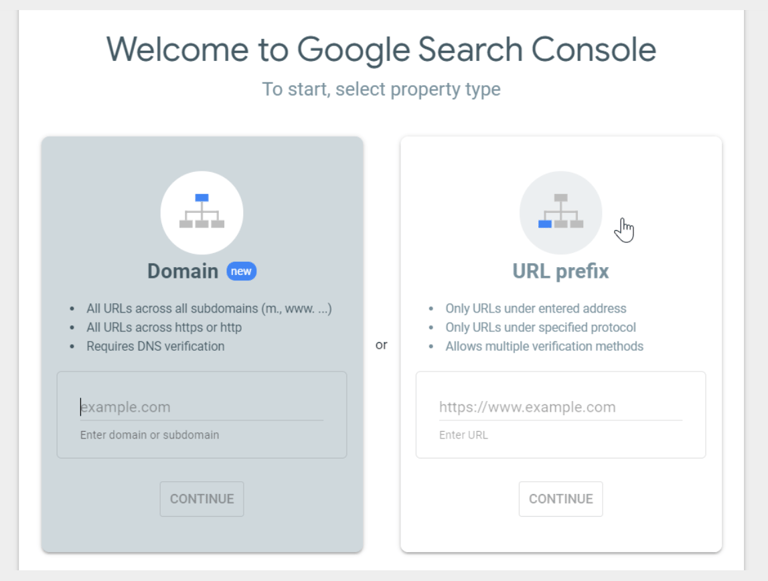
Step 3: You will then have to verify your website
How to Verify Your Website
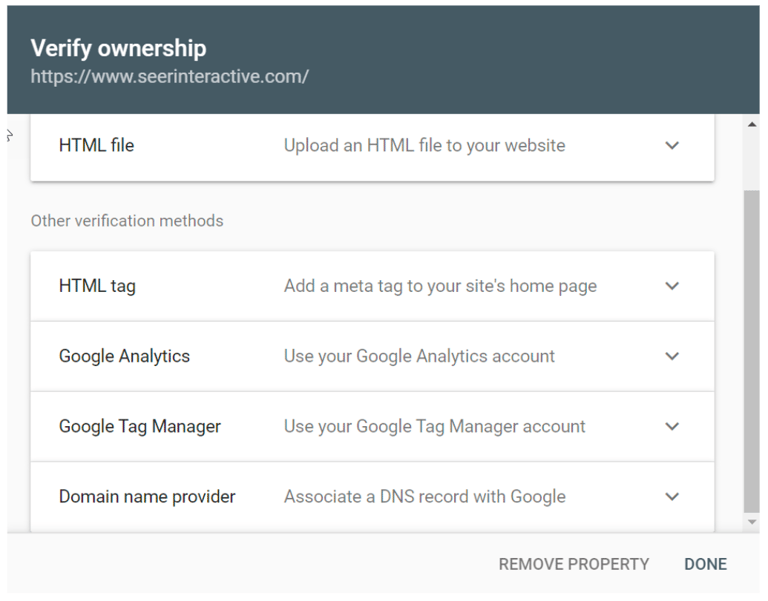
After adding a site to Search Console you can verify in several different ways:
Upload HTML verification file
If you have access to your site’s root directory, you can upload an HTML file for Search Console verification. Once you select this option, you will need to download the HTML file and upload it to the location specified in the instructions. After uploading the file, select Verify to complete the process.
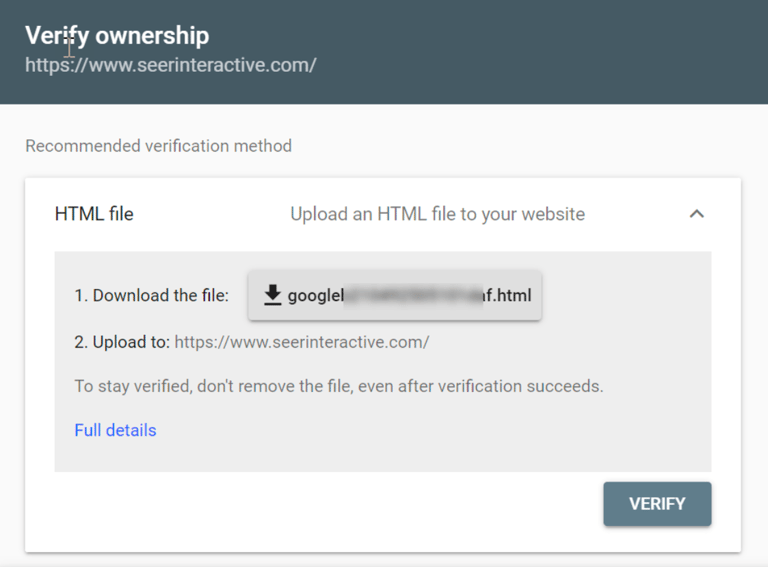
After you have verified the site, you should not make any changes to the file or filename or delete the HTML file from your site as this will undo verification.
Verifying through domain name provider
To verify your site through the domain provider, choose your domain provider from the list or choose Other for instructions on creating a DNS TXT record. If your provider cannot create a DNS TXT record you can create a CNAME record instead.
Adding a meta tag to your homepage
If you have experience with HTML, you can add a provided verification code into the <head> of your homepage. Once the code has been added, saved, and published, you can return to Search Console and select Verify to complete the process.
Adding Google Analytics tracking code
If you have a Google Analytics account for reporting on your site and you have the GA tracking code within the <head> of your homepage, you can add a tracking code through your Analytics property.
If you use this method and remove the GA code from your site it will undo verification.
Using Google Tag Manager container snippet
If you use Google Tag Manager for your site, have “View, Edit, and Manage” permissions enabled in your account, and your GTM code is placed after the <body> tag on your site, you can use this method to verify your site in Search Console.
If you use this method and remove the GTM code from your site it will undo verification.
Adding Subdomains & Subdirectories
It’s important to add all versions of your domains (http vs https, www vs non-www) as separate properties that you can manage, even if one fully redirects to another.
The below example URLs would be considered different to search engines and should be added as separate properties if relevant:
- http://example.com/
- https://example.com/
- http://www.example.com/
- https://www.example.com/
If your website has any subdomains, subdirectories specific to language, countries, or content, or staging servers, you can get more specified data by adding these as separate properties.
This will allow you to set geographic targeting, define sitemaps, and more.
Examples of sub-domains/directories that could be added as separate properties:
- http://blog.example.com/
- http://example.com/fr/
- http://example.com/en/
- http://example.com/amp/
- http://staging.example.com/
If you are already verified for a domain, you are automatically verified for all subdomains of that domain. If you are already verified for a site, you are automatically verified for all subdirectories of that site.
Managing Owners
Owners have full control over properties in Webmaster tools. This includes the ability to add and remove other users, configure settings, use all tools, and view all data. If you want to add someone with more limited access, add them as a full or restricted user.
How to Add a New Owner
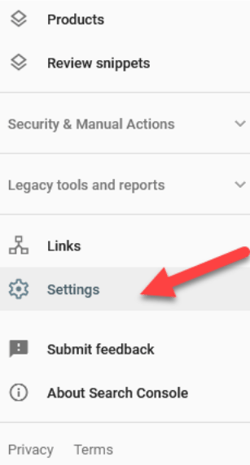
Step 1: Log in to Search Console, click the gear icon at the bottom of the left hand menu and select Users and permissions
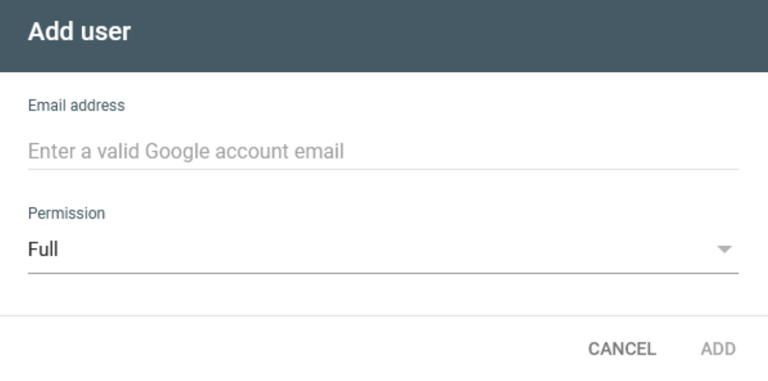
Step 2: Click the blue Add User button.

Step 3: Under Verified Owners at the bottom of the page, click Add an owner
Step 4: Type in the new owner’s email address and click Continue
How to Add a New Owner
Note: You can click on all screenshots below to view at a larger size.
Step 1: Log in to Search Console, click the gear icon and select Users and Property Owner

Step 2: Click Manage property owners link
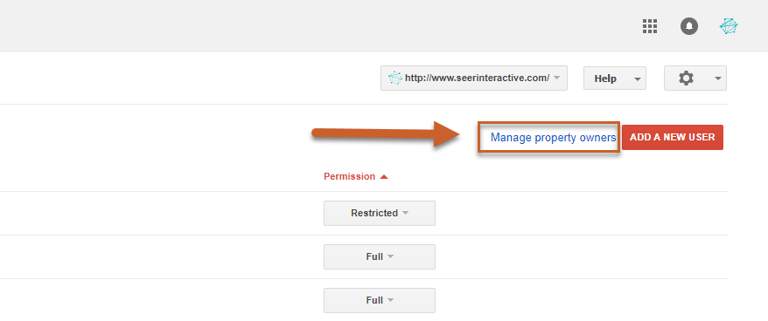
Step 3: Under the Verified Owners section at the bottom of the page, click Add an owner
Step 4: Type in the new owner’s email address and click Continue

Step 5: The new owner can then add the property to their Search Console, where it will be automatically verified. If the owner does not verify ownership, they will remain a Delegated Owner.
How to Delete a Delegated Owner
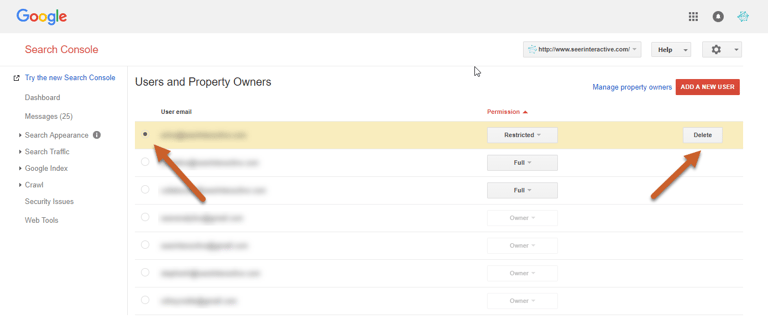
Step 1: Click the gear icon and select Users and property owners
Step 2: Select the target email under the Users and Property Owners section and click Delete
How to Delete a Verified Owner
You can easily delete a Delegated Owner, but to delete a Verified Owner you must first remove their verification (making them a Delegated Owner).
Step 1: To unverify an Owner, click the gear icon and select Users and property owners
Step 2: Click Manage property owners link
Step 3: Select Unverify
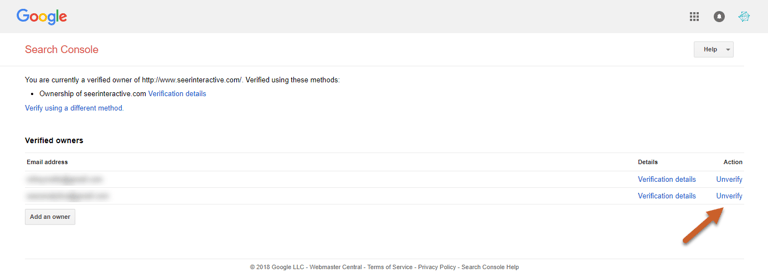
Step 4: You can then follow the instructions above to delete a Delegated Owner to complete the process
Managing Users
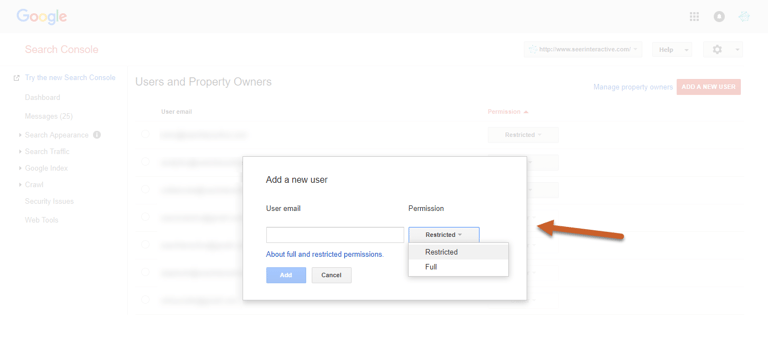
Properties in Search Console can have a total of 100 full or restricted users. A full user has view rights, and can take some actions, while a restricted user has view rights for most data. See Permissions for Search Console Users for more information.
Adding a User to Your Property
Note: You can click on all screenshots below to view at a larger size.
Step 1: Log in to Search Console, click the gear icon and select Users and Property Owners

Step 2: Select Add a New User
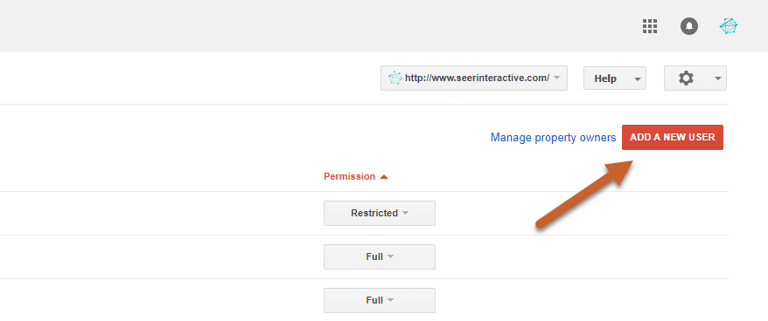
Step 3: Type the email address of the user you want to add and select the user type
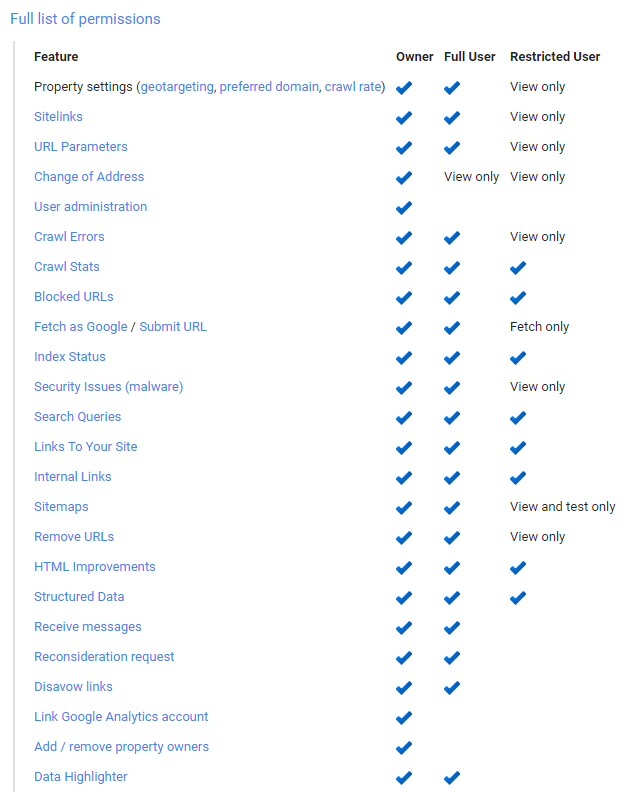
Permissions for Users
The below table includes the full list of permissions for different account roles to help you decide what type of access you should grant to new owners or users.
Deleting a User
Step 1: Click the gear icon and select Users and property owners
Step 2: Select the target email under the Users and Property Owners section and click Delete

What is Fetch and Render?
Search Console’s Fetch and Render will test how Google crawls and renders a page on your site. This can help you understand how Google sees a page, tell you about elements that might be hidden within the page, safely check hacked pages, or help debug crawl issues.
Fetch will return the page’s code (how Google sees the page), and Fetch and Render will return the page’s code along with two side-by-side images — one version that users see and one version that Google “sees”.
How to Fetch & Render
Note: You can click on all screenshots below to view at a larger size.
Step 1: Log in to Search Console and navigate to Crawl, then select Fetch as Google
Step 2: Add the relative path of the URL
The relative path of the URL is the portion that does not include the protocol (http, https) or domain (www.example.com). For example, the relative path of the URL https://www.example.com/fetch-this-url would be “fetch-this-url”.
The domain name is already provided in the Fetch and Render tool, so you only need what comes after the trailing slash of the domain name. Fetch and Render is case-sensitive.
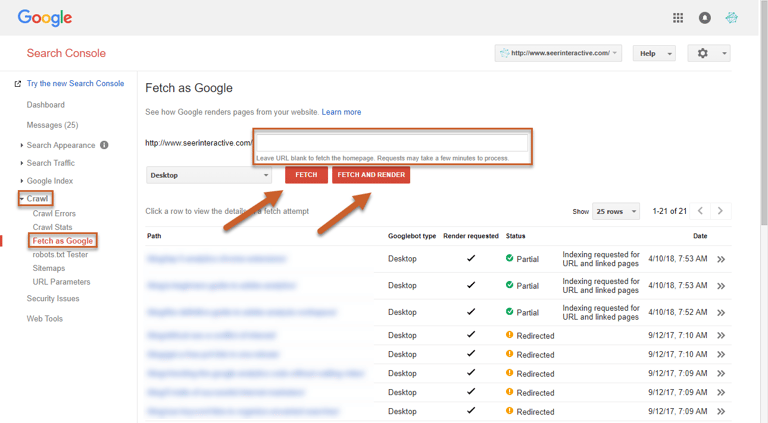
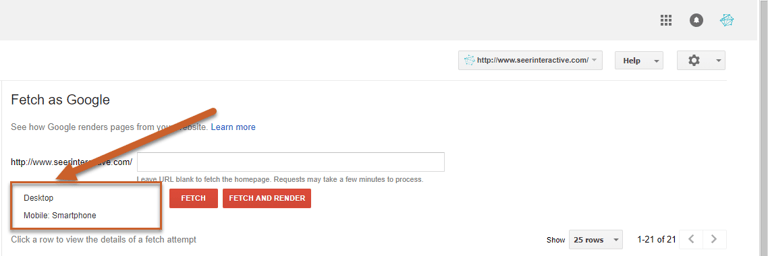
Step 3: (Optional) Select what type of Googlebot to perform the fetch as — Desktop or Mobile: Smartphone
Step 4: Select Fetch or Fetch and Render
- Fetch: fetches the requested URL and displays the HTTP status
- Fetch and Render: fetches the requested URL, displays the HTTP status, and renders the page based on the specified platform (desktop or smartphone). This can be understand any visual differences between how a user would see your page compared to how Google would see your page.
Fetch Statuses
After you’ve made your fetch request, Google will use several different status to indicate the HTTP response along with any suggested actions to take based on responses.
- Complete: If your status is complete then Google was able to make contact with your site and its referenced resources.
- Partial: If your status is partial it means that Google was able to contact and fetch the site but the robots.txt file blocked a resource referenced by the page. Clicking on the status will show you exactly which resource was blocked and the severity of the blocked resource.
- Redirected: Search Console will only check the exact URL requested – any redirects to another page will receive a Redirect status. Clicking on the status will show you where the page points to.
- Not Found: Usually this status is from a 404 error, but can also occur when a site is hacked and Google does not want to index the page.
- Not Authorized: This could be caused by a 403 error or other type of restricted access.
- DNS Not Found: If your status is not found, it could be caused by a typo or instance of website downtime.
- Unreachable robots.txt: Google cannot reach the host of the resource for robots.txt — the robots.txt file may need to be tested and updated.
- Unreachable: This status is often due to a timeout error.
- Temporarily Unreachable: This status is also often due to a timeout error or too many fetch requests.
- Error: This status is uncommon and results from an unknown or unspecified error. If this status occurs multiple times, Google suggests posting to their help forum.
Submitting a URL to Index
If you’ve added new content or made any changes to your site, you can ask Google to recrawl the page by using the Fetch and Render tool.
Step 1: Log in to Search Console and Request a Fetch or Fetch and Render for the page
Step 2: If you have received a Complete, Partial, or Redirected status, a Request Indexing button will appear to the right of the status.
If the request feature does not appear, the fetch didn’t fulfill the status requirements, meaning that your Fetch status needs to be resolved. Your fetch must also be under 4 hours old in order to Request Indexing.
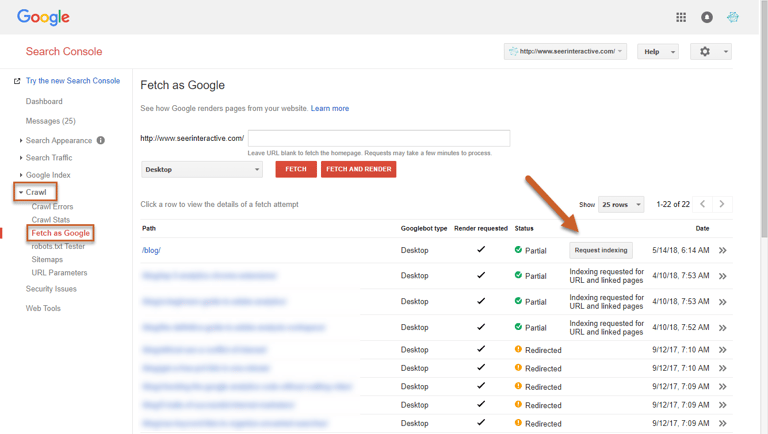
Step 3: Click Request Indexing
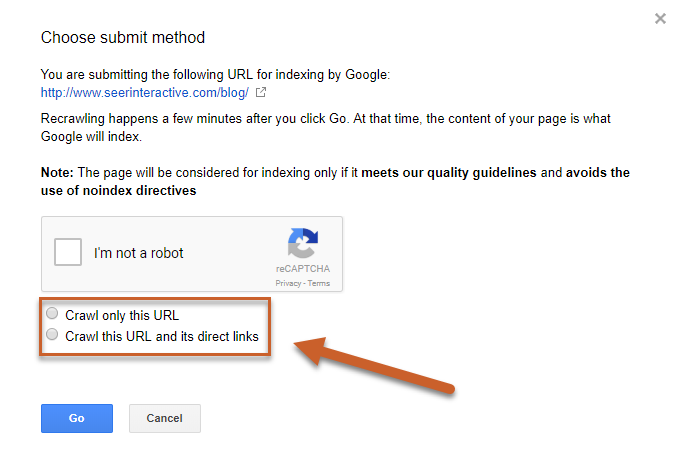
Step 4: Select whether to Crawl only this URL or Crawl this URL and its direct links
- Crawl only this URL submits only the selected URL to Google for re-crawling. You can submit up to 10 individual URLs per day.
- Crawl this URL and its direct links submits the URL as well as all the other pages that URL links to directly for re-crawling. You can submit up to 2 site recrawl requests per day.
How to Remove a URL From Search Results
There are several ways to remove pages from Google’s index – changing the status to 404 and allowing the page to drop naturally or adding a noindex meta tag to your page are some solutions – but they aren’t always immediate.
Webmaster Tools features a URL Removal tool to temporarily hide a URL from search results for 90 days.
You can use the URL Removal tool to hide pages from search results while giving Google time to fully understand a new directive (like a 301-redirect, 404 status, or noindex tag). You can also use the tool to hide a page from results if you had updates you wanted to make without users arriving on the page from search.
You need to be the owner of the Search Console property to use this tool; other users will not be able to use it.
Remove URL in Webmaster Tools
Note: You can click on all screenshots below to view at a larger size.
Step 1: If using this tool to hide a URL from search during removal, make sure that your URL is 301-redirected, set to 404 status, or includes a noindex tag in the header.
Step 2: Log in to Google Search Console and navigate to Google Index > Remove URLs
Step 3: Select Temporarily hide and enter the relative path of the URL
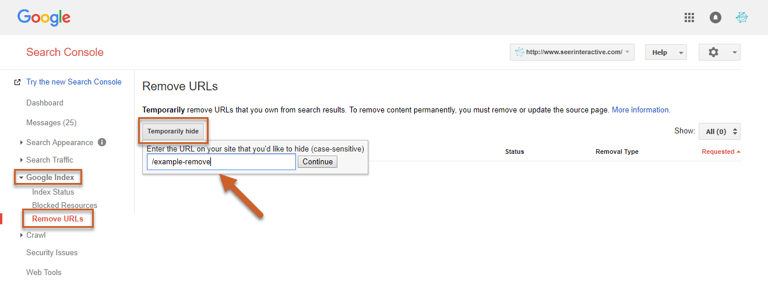
Step 4: Click Continue
Step 5: Select a Request type
- Temporarily hide page from search results and remove from cache will clear the cached copy of the page and snippet, then hide the page from the SERPs for 90 days from Google.
- Remove page from cache only will remove the cached copy of the page and snippet, but will not hide the page from SERPs. Google will then refresh the page and snippet.
- Temporarily hide directory will hide the entire directory for 90 days and clear cached pages and snippets. Google will recrawl during this period and refresh the cached pages and snippets.
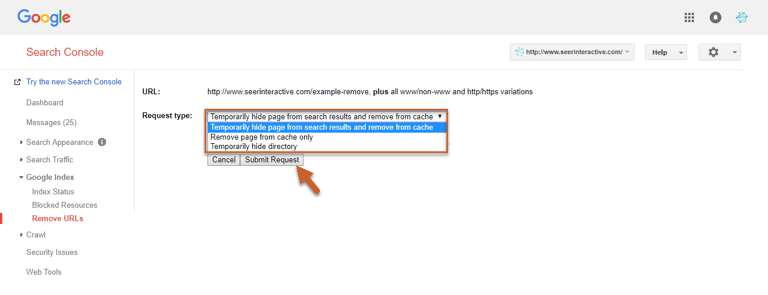
Step 6: Click Submit Request
Step 7: The request can take around 24 hours to process so check back to make sure that the request went through.
Step 8: If your request was denied, select Learn More for more information on why Google may have denied the request.
Undo Remove URL Request in Search Console
If you need to remove the 90-day block on your page, you can navigate back to the Remove URL status page and click Reinclude. The request may take a few days to process.
Remove Outdated Content Tool
Google also has a Remove Outdated Content Tool – this tool is for reporting a search result that you do NOT own where either the result in SERPs is different from the current page or if the page no longer exists.
You should not use this tool to remove pages from any sites that you own.
HTML Improvements Report
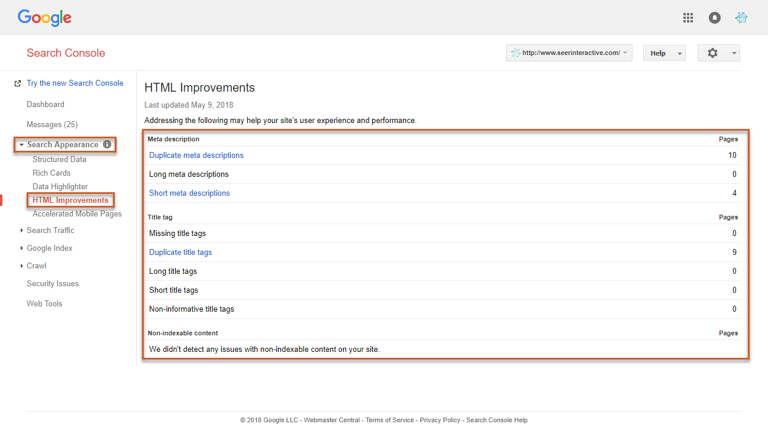
The HTML Improvements report can diagnose some common issues regarding metadata and indexable content, including:
- Duplicate meta descriptions
- Long meta descriptions
- Short meta descriptions
- Missing title tags
- Duplicate title tags
- Long title tags
- Short title tags
- Non-informative title tags
- Non-indexable content
Access the report by navigating to Search Appearance and clicking on HTML Improvements in Search Console.
Note: You can click on the screenshot below to view at a larger size.
How to Submit an XML Sitemap to Google
Submitting your sitemap to Google Webmaster Tools allows Googlebot to crawl and index your site more effectively by giving them a full list of your site’s pages.
Note: You can click on all screenshots below to view at a larger size.
Step 1: Before you submit your sitemap to Search Console, you will need to generate your sitemap file and upload it to the root of your site, most commonly under the path: /sitemap.xml
Step 2: Log in to Search Console and select Crawl, then click Sitemaps on the left navigation
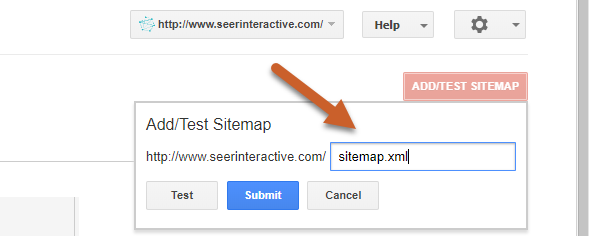
Step 3: Click the Add/Test Sitemap button in the top right corner
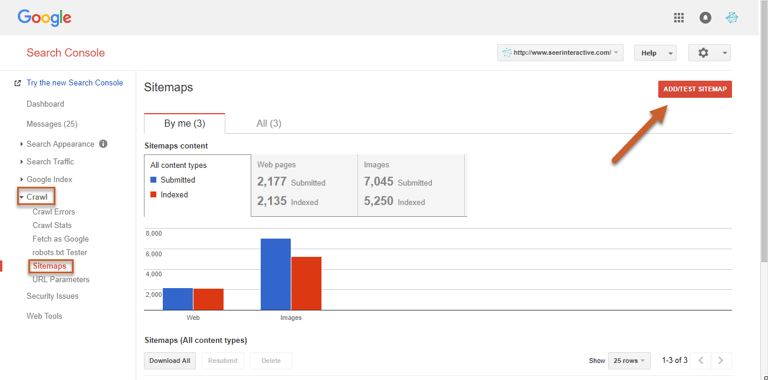
Step 4: Enter the URL of your sitemap, then click Submit
How to Generate and Test a Robots.txt File
Sometimes you don’t want Googlebot indexing every page of your site – the robots.txt file tells webcrawlers which pages they should access and which pages they should ignore. You can use this to make sure that certain content is blocked from search engines like staging sites, internal search result pages, paid search landing pages, or more.
Creating and Editing Your Robots.txt File
Note: You can click on all screenshots below to view at a larger size.
Step 1: Log in to Search Console and select Crawl, then click robots.txt on the left navigation
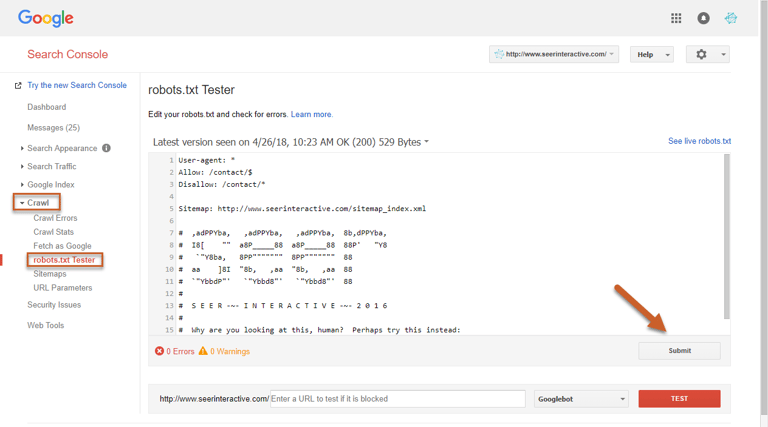
Step 2: You are now looking at your robots.txt file and can make any edits within the tester
Step 3: Once you’ve completed your edits and your robots.txt looks the way you want it, click Submit
Step 4: Download the code and upload the updated robots.txt to your site’s root domain
Step 5: After you’ve uploaded the new version to your website, return to Google Search Console and click View uploaded to verify that the correct version is live
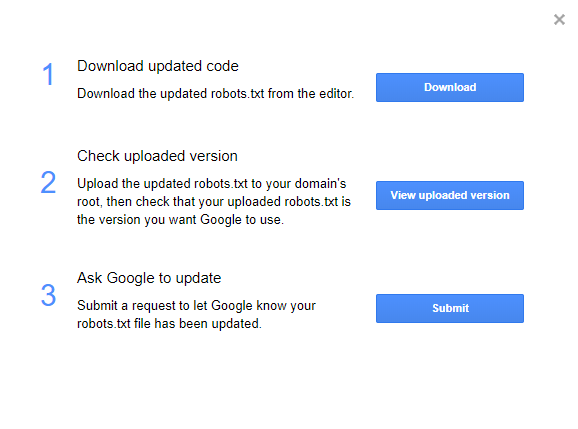
Step 6: Click Submit to let Google know your robots.txt has been updated
Testing a Robots.txt File in Search Console
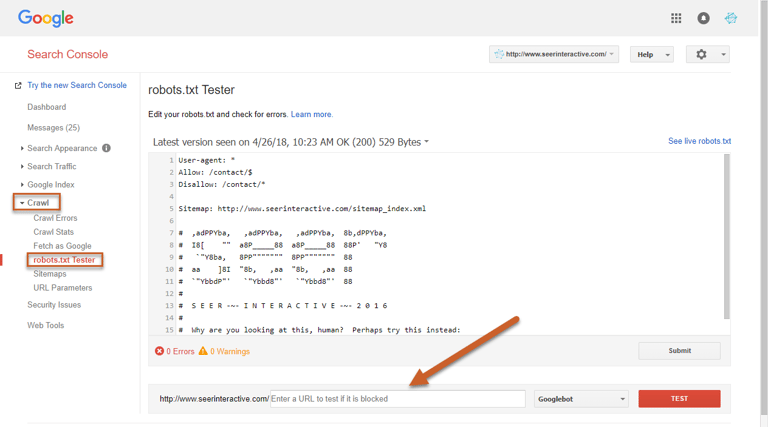
You can use the Tester at the bottom of the page to choose from Google’s user-agents (different robots/crawlers), enter a URL, and test whether or not the URL is recognized by that crawler with the current robots.txt directives.
Using URL Parameters in Webmaster Tools
You can configure URL parameters in Search Console to tell Google whether it should crawl or ignore specific parameters to prevent duplication.
What are URL Parameters?
URL Parameters are parameters with values that are set dynamically within a pages URL. This enables a single page to show an infinite number of different views.
Active parameters can change page content for users by transforming or sorting a page a certain way. The URLs below are examples of what active parameters could look like sorting a category page for dresses in different ways.
- http://www.example.com/products/dresses/?sort=price_high
- http://www.example.com/products/dresses/?sort=price_low
- http://www.example.com/products/dresses/search?color=red&size=8
Passive parameters don’t have any affect on how content appears to users, but can track visits or referrals. The below URLs are examples of what passive parameters could look like:
- http://www.example.com/products/dresses/?sessionid=12345
- http://www.example.com/products/dresses?utm_source=google&utm_medium=email&utm_campaign=param
In either case, most parameters don’t actually affect the actual content on the page, meaning that in a search engine’s eyes, all of the below pages are duplicates:
- http://www.example.com/products/dresses/?sort=price_high
- http://www.example.com/products/dresses/?sort=price_low
- http://www.example.com/products/dresses/search?color=red&size=8
- http://www.example.com/products/dresses/?sessionid=12345
- http://www.example.com/products/dresses?utm_source=google&utm_medium=email&utm_campaign=param
Click through to read a more in-depth post on common duplicate content issues, including parameterized URLs.
How to Configure URL Parameters
Search Console features a tool that will tell Google which parameters to ignore, which can prevent duplication from parameterized URLs.
This is the place where I tell you to use this tool with caution – if you make a mistake in this tool and incorrectly exclude URLs it could result in pages or your entire site disappearing from search. So don’t do that.
This tool is also not all-powerful. If you have parameters in your sitemaps or used in internal linking, this could confuse Google and cause them to index the parameterized URLs anyway.
Step 1: Log in to Search Console and click on Crawl, then URL Parameters
Step 2: Click Configure URL Parameters
Note: You can click on all screenshots below to view at a larger size.
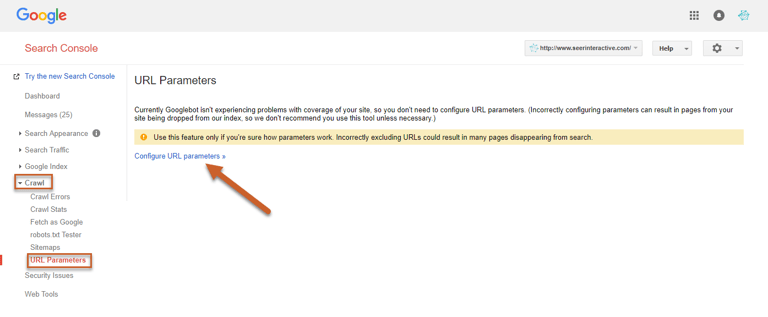
Step 3: Click the Add parameter button
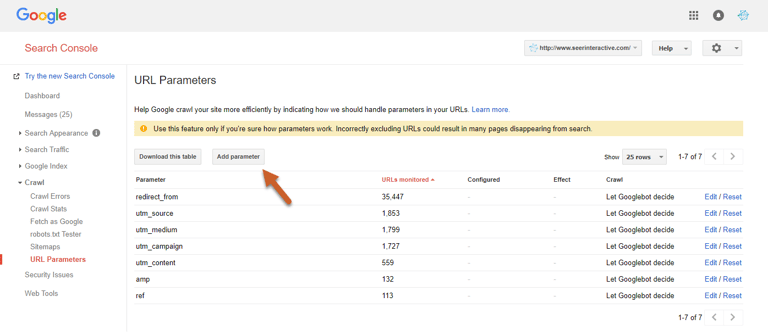
Step 4: Enter your parameter
Step 5: Select whether or not the parameter changes how content is seen by the user
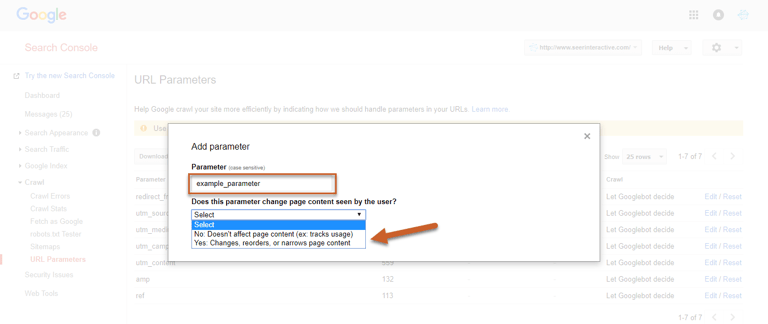
If you selected No: Doesn’t affect page content (ex. tracks usage), then you can click Save
The “No” option is for passive parameters – meaning that the page content stays the same with or without the parameter. Google will just pick the version of the URL it thinks is primary and index that version.
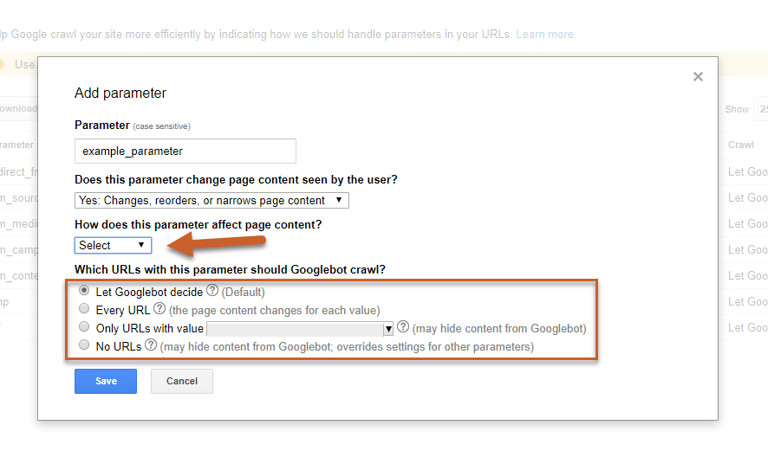
Step 6: If you selected Yes: Changes, reorders, or narrows page content, you must then select how the parameter affects content (sorts, narrows, specifies, translates, paginates, or other) and then tell Google which URLs with the parameter that Googlebot is allowed to crawl.
The “Yes” option is for active parameters – meaning that the page content is different with each parameter.You can then choose if Googlebot should decide which pages to crawl, if every URL should be crawled, if only URLs with specific values should be crawled, or if no URLs should be crawled.
Changes using the URL Parameter tool may not be reflected in the SERPs for several months, so it’s good practice to regularly use a site:query search to check every few weeks to verify.
How to Fix Crawl Errors
Site Errors
Site Errors are issues that affect your entire website, and should be prioritized. Below is an example of what you want to see – no site errors.
Note: You can click on all screenshots below to view at a larger size.

Possible site errors include:
DNS Errors
DNS errors are a major problem – this means that Googlebot couldn’t connect with your domain due to a DNS lookup or DNS timeout issue.
Server Connectivity Errors
Server errors usually mean that your site is taking too long to respond, so the request times out. This means that Googlebot can connect to your site but can’t load the page.
Robots.txt Fetch Errors
A Robots error means that the Googlebot cannot retrieve your robots.txt file from [example.com]/robots.txt. However, you only need a robots.txt file if you don’t want Google to crawl certain pages. If you don’t have a robots.txt file, the server will return a 404 and Googlebot will simply continue to crawl your site.

URL Errors
URL Errors affect individual pages of your site and are categorized by Desktop or Smartphone.
Types of URL errors include:
Server Errors
Server errors happen when Googlebot couldn’t access your URL, the request timed out, or your site was busy.
Soft 404s
A Soft 404 status happens when a page displays as 200 (found) when it should display as not found (404). For pages that don’t exist, they should either be 404d or 301 redirected to a relevant page. Any live pages that display as soft 404 should be audited to ensure that there isn’t thin content or content that might indicate a 404 page.
Not Found (404)
A 404 means that Google tried to crawl a page on your site that does not or no longer exists. Googlebot finds 404 pages when other sites or pages link to that non-existent page.
If the page is an important page, you should address the issue immediately.
Access Denied
This error often indicates that the URL requires a login or your hosting provider is blocking Google from accessing your site.
Not Followed
Not Followed errors can often indicate crawling issues from JavaScript, Flash or other forms of active content or improper redirects.
DNS Error
DNS errors indicate that Googlebot couldn’t connect with the URL due to a DNS lookup or DNS timeout issue.
How to Fix 404 Errors in Webmaster Tools
If you find a 404 error, there are a few ways to resolve it using Google Search Console.
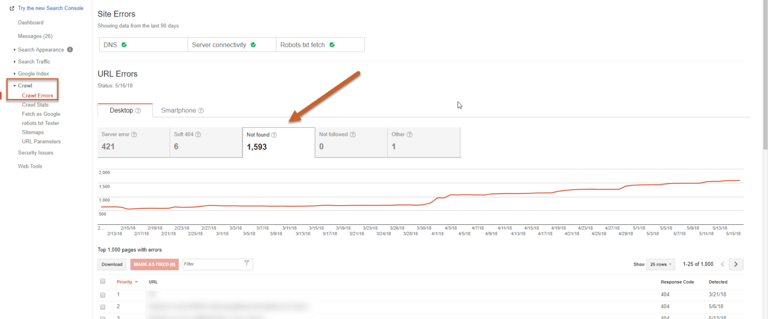
Step 1: Log in to Search Console, click on Crawl, then click Crawl Errors
Step 2: Click on the Not Found tab to view 404 errors
Step 3: Click on the first URL to show a popup with two tabs: Error Details and Linked from
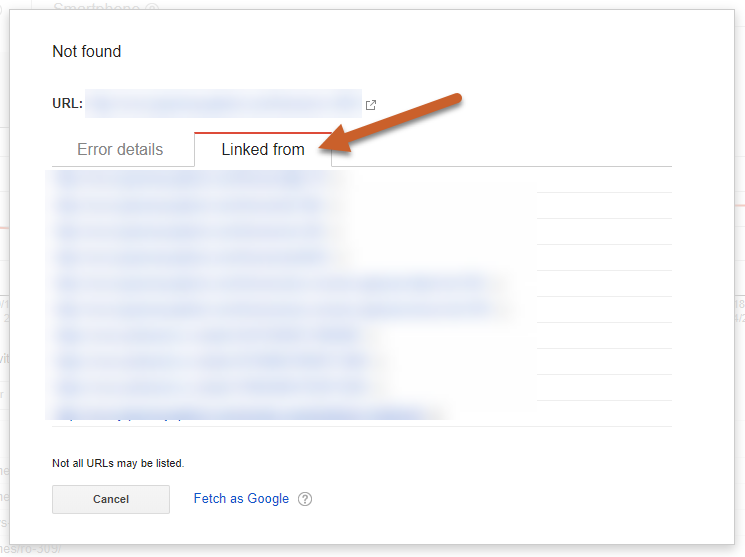
Step 4: In the Linked from tab, you can see what internal and external links are pointing to the 404 pages.
If the URL was a previously existing page, you could 301 redirect the old URL to a relevant page. If there is a misspelling or error, you can reach out to the supplier of the incorrect URL asking them to update their link to the correct URL.
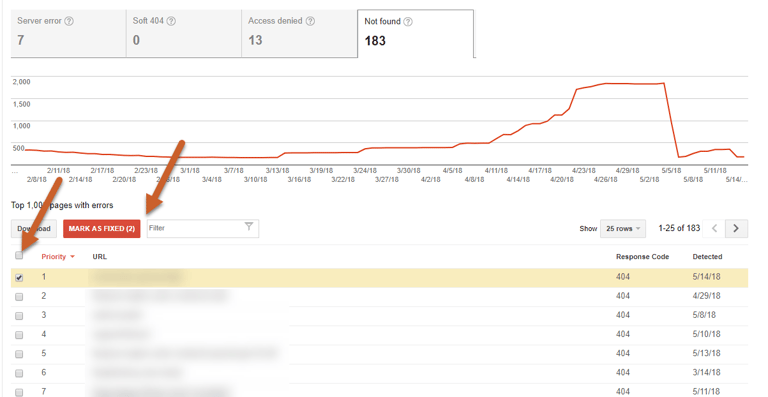
Step 5: If a page is properly 404d, you can either ignore it or select Mark as Fixed to remove the 404 from your Search Console error report.
However, if Google is still finding the URL (through links, in your sitemap, etc…) it may recrawl this page at a later date and will reappear in the Crawl Error report.
Find and Fix Structured Data Markup Errors
Structured data markup can provide additional data to search engines so they can serve up better, more accurate search results. Structured data can also provide enhanced presentations within the search results pages themselves, making results more visible or helpful to users. However, structured data can also be tricky to use – luckily, Search Console features a tool to quickly identify structured data errors.
Data Errors
Note: You can click on all screenshots below to view at a larger size.
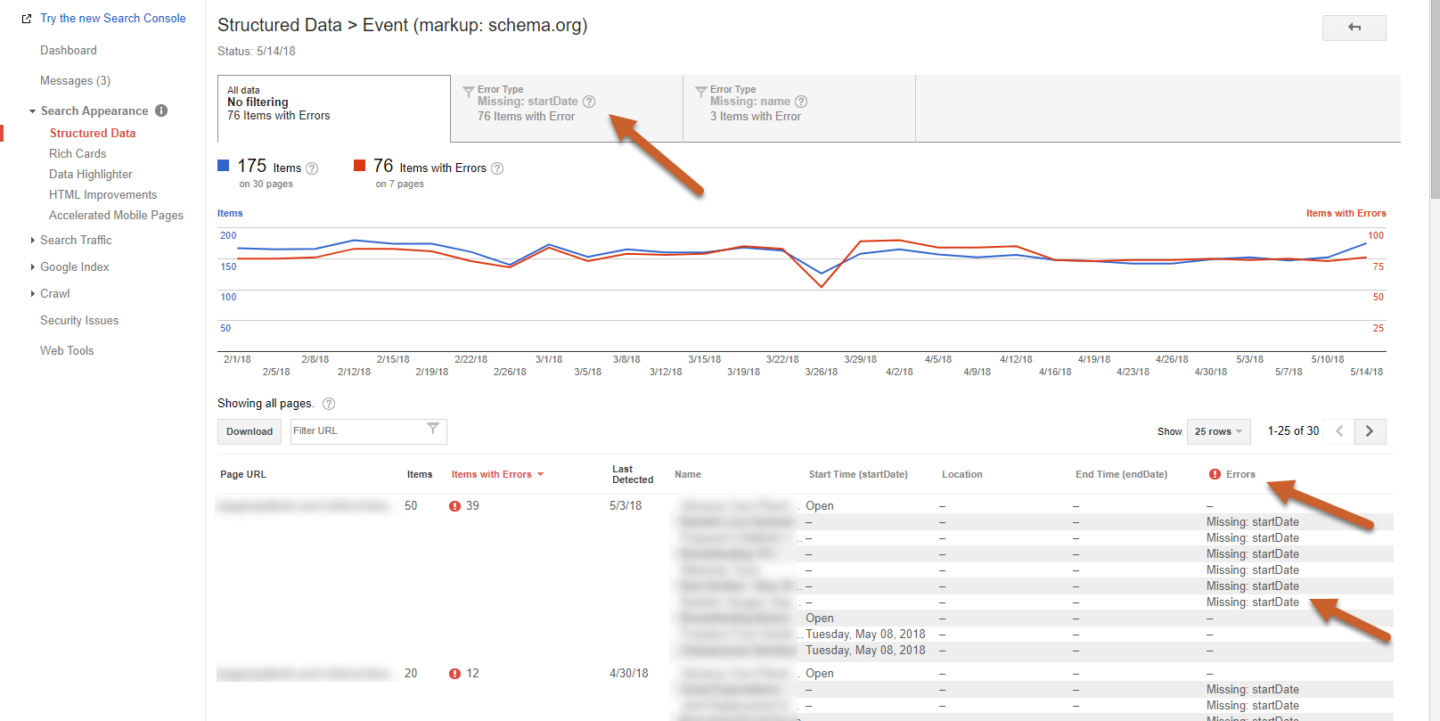
Step 1: Log in to Search Console and click on Search Appearance, click Structured Data
Step 2: Check to see if any Errors are called out at the top of the report
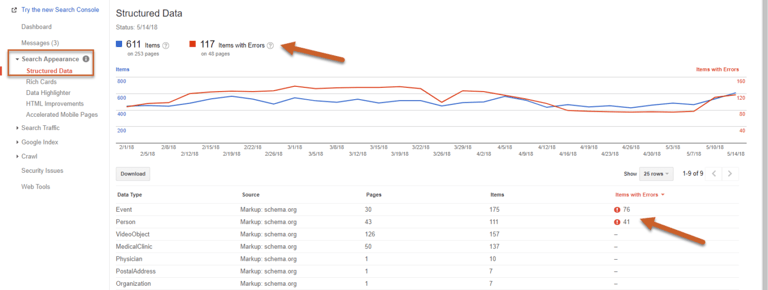
Step 3: If you have errors, click on the error number to view the pages with errors for that specific type of schema
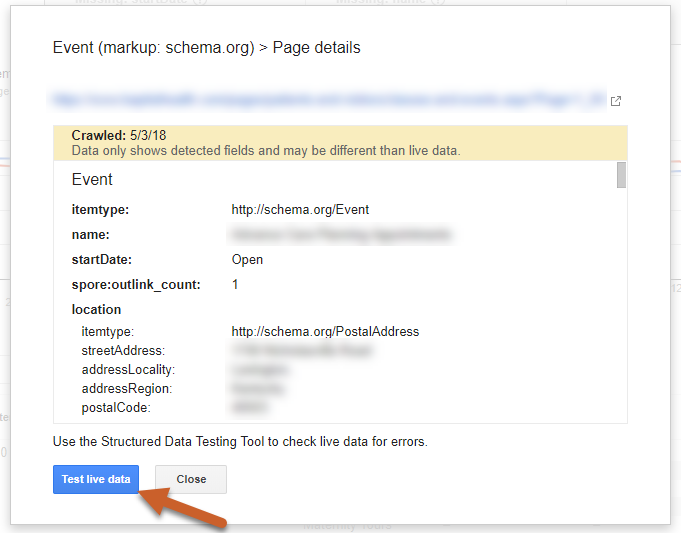
Step 4: Click on a page URL to expand the Page details and click the Test live data button to open the Structured Data Testing Tool
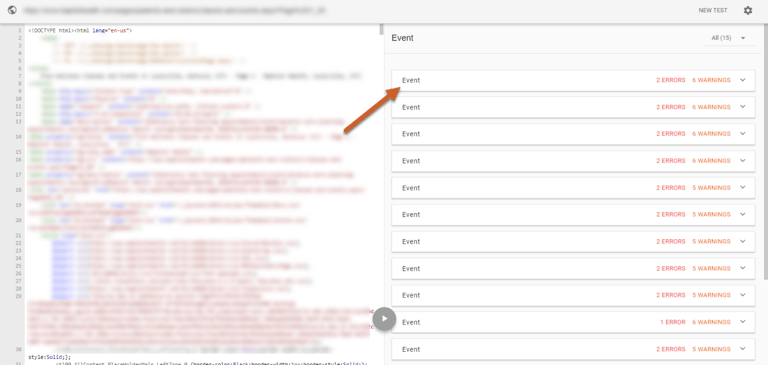
Step 5: In the Structured Data Testing Tool, you can click on the individual markup to expand to view its elements and any errors or warnings
Here we can see that the value “Open” is causing an error in startDate. Event schema requires a startDate. To fix this issue we would add the proper start dates to each Event with an error.
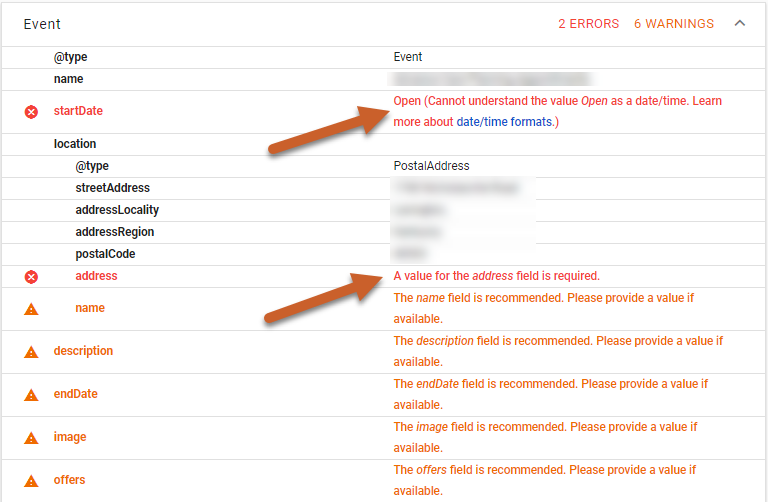
We can also see there is an error within the location schema. It doesn’t have a value for the address field.
Here is an example of the current schema markup:
<script type='application/ld+json'>
{
  "@context": "http://schema.org/",
  "@type": "Event",
   "name": "Example",
  "startDate": "2018-06-10",
"location": {
    "@type": "PostalAddress",
    "streetAddress": "1234 Example Street",
    "addressLocality": "Philadelphia",
    "postalCode": "19123",
    "addressRegion": "PA",
    "addressCountry": "US"
  }
 }
</script>sentences = text.split( '. ' );
Here is an example of the recommended schema for the fix:
<script type='application/ld+json'>
{
  "@context": "http://schema.org/",
  "@type": "Event",
   "name": "Example",
  "startDate": "2018-06-10",
"location": {
  "@type": "Place",
  "Address":{
    "@type": "PostalAddress",
    "streetAddress": "1234 Example Street",
    "addressLocality": "Philadelphia",
    "postalCode": "19123",
    "addressRegion": "PA",
    "addressCountry": "US"
  }
 }
}
</script>
Step 6: Once you’ve fixed your structured data errors, resubmit your page for indexing!
Linking Search Console to Google Analytics
Connecting Search Console with Google Analytics makes it easier to understand how rankings and specific keywords lead to organic performance and behavior on your site.
How to Connect to Google Analytics
Note: You can click on all screenshots below to view at a larger size.
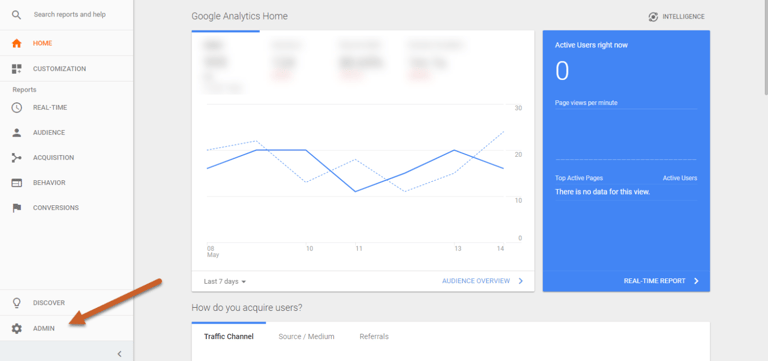
Step 1: Log in to your Google Analytics account and click Admin in the bottom left corner
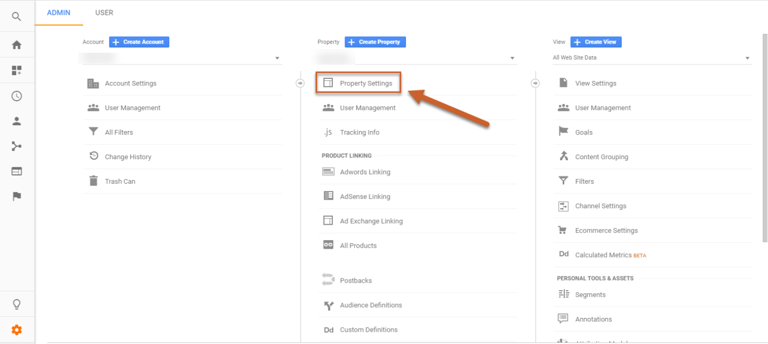
Step 2: Navigate to the property where you want to enable Search Console data and click Property Settings under the Property column
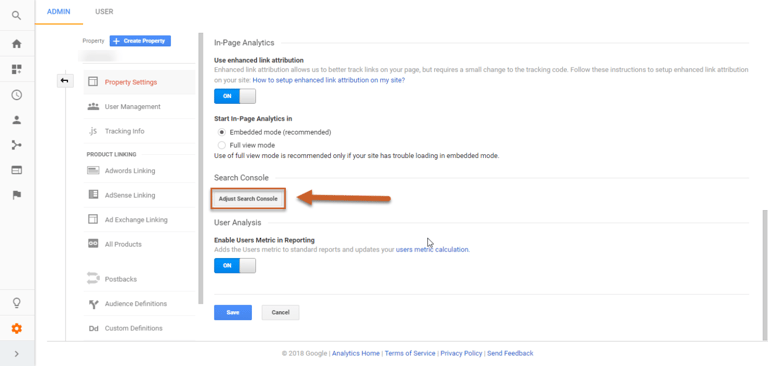
Step 3: Scroll down to Search Console Settings and click Adjust Search Console. If you’ve already verified your site in Search Console using the same email address, it should appear automatically.
Step 4: Select the reporting view where you want to see Search Console data and click Save

Linking Search Console to Google Ads
You can better understand the relationship between your paid and organic data by linking your Search Console account with Google Ads.
How to Connect to Google Ads
Note: You can click on all screenshots below to view at a larger size.
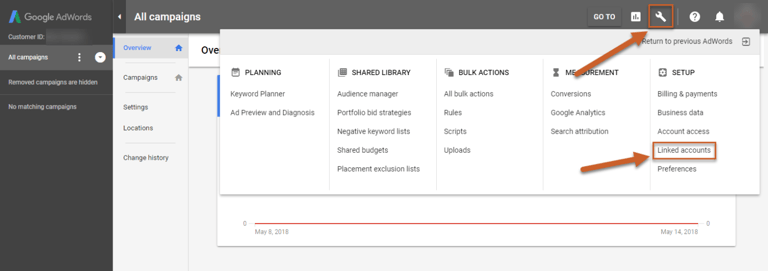
Step 1: Log in and click the Tool icon in the top right corner, then select Linked Accounts under Setup
Step 2: Scroll to the bottom of the list and click Details under the Search Console section
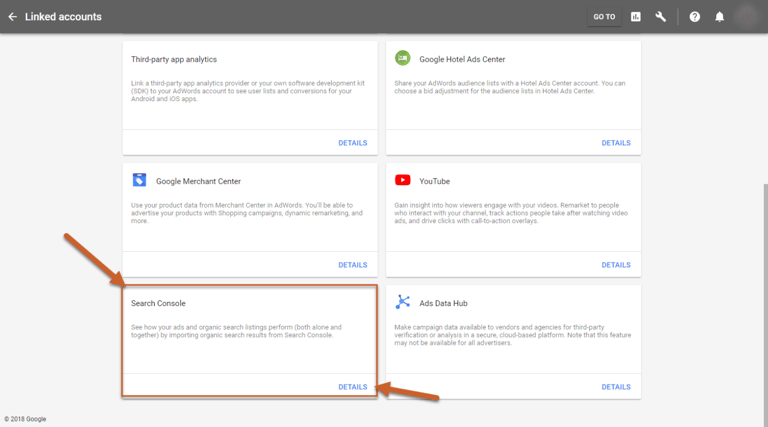
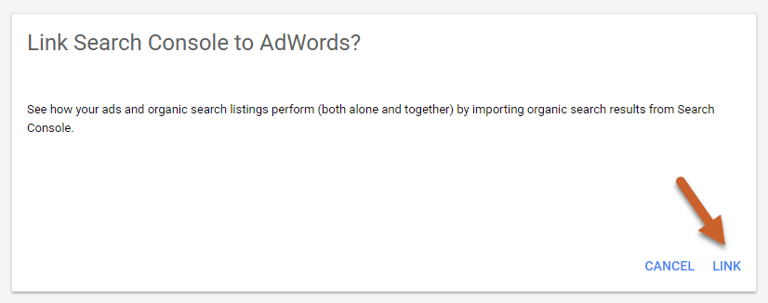
Step 3: In the popup box, click Link
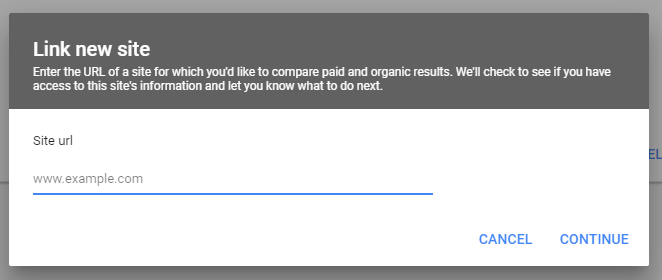
Step 4: Enter the URL of the website you want to link and click Continue. You don’t need to specify http vs https but you do need to specify www vs non-www.
Step 5: If your Ads account was listed as an owner website in Search Console, you’ll see Linked in the status column.
If your Ads account was not listed as an owner, you’ll see Access Requested in status.
If there is no Search Console account set up for the website you’re trying to link to, you’ll see Not claimed in the status column.

How to Remove a Site From Search Console
To remove a property in Google Search Console, log into the dashboard and select the Manage Property button to the right of the property you want to remove, then select Delete property from the dropdown menu.

In Conclusion
We hope this guide helped you navigate the essentials of GSC.
Google is always testing out new tools and reports, so we recommend checking out the GSC beta in order to move beyond the basics in this guide.
Thanks for reading! Don't forget to subscribe to the Seer Newsletter for more SEO guides, industry updates, and more:


