A/B testing is one of the quickest and lowest lift ways of using data to make changes on your website. By the end of this post, my goal is to convince you why A/B testing is a must for driving bottom-line improvements to your website.
But first, let’s define what A/B testing is, if Google Optimize is the right tool for you, and see if Optimize 360 might be a better fit for your needs.
Why A/B Testing?
A/B testing is the method of testing against a control (the original page - your A) vs. a variant (your modification of the page - your B). By using this approach, you aim to send an equal amount of traffic to both the control and the variant, with a specific hypothesis/goal in mind, and let the data decide which performs better.

A/B testing at its heart is one of the purest methods of using data to make decisions, because we make no assumptions, no calls based on our gut, but rather, put our tests out into the wild and let the users, their actions, and the data from those actions decide our next steps.
To learn how to develop a balanced approach to A/B testing overall, I suggest reading my previous post on having a data-driven approach to A/B testing, which guides you on coming up with smart hypotheses for A/B tests from the start.
Why Google Optimize?
There are tons of tools that one can use for A/B testing, so you may be asking, why is Google Optimize the right tool for me?
I’d argue that you are best off using Google Optimize if you are already integrated with other Google products such as Google Analytics and Google Ads. Here are the benefits of using Google Optimize with each:
- Google Optimize + Google Analytics - Google Optimize syncs with your Google Analytics data (at the view level) to allow you to judge results, further analyze test performance with Optimize dimensions in GA, and with better target your testing efforts with Google Analytics audiences using Optimize 360 (more on that soon!).
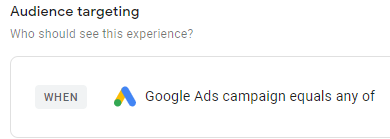
- Google Optimize + Google Ads - Google Optimize also allows you to target users who come from specific Google Ads campaigns, ad groups and keywords to your site. This can be used to personalize PPC landing pages based on the user’s search intent! Learn more about how to use this targeting using Google’s instructions:
Ultimately, other A/B testing tools feature many of the same aspects as Optimize, but with Optimize being free and integrating with other Google tools, that is a major bonus for anyone looking to start out with A/B testing with a Google foundation.
However, if you are looking for an enterprise solution, Optimize’s paid version (Optimize 360) may be the best fit for you.
Optimize vs. Optimize 360
Optimize 360 is the solution for an enterprise level client looking to A/B test -- read more about Optimize 360’s features here. As mentioned previously, Optimize 360 also integrates with Google Analytics 360 in unique ways, so if you already use GA360, this is a good tool for you to explore.
Seer is an Optimize 360 reseller as well, so if you are interested in exploring Optimize 360 as a solution for your business, reach out and we can chat further!
If you’re sold on Optimize (or Optimize 360) as a tool for you, let’s explore how you can set it up and start testing!
Setting Up Google Optimize
Yes, you can use Google Tag Manager (or GTM) to set-up part of Google Optimize’s code.
But, at the very least - you’ll still need to install the anti-flickering snippet to your on-page code. Ideally - you install it on all pages of your site to make your testing as flexible as possible. However, you can add this snippet only to the single page you're testing too - if you're more comfortable with that.
Keep in mind - adding this code to your site does not in and of itself create tests, it only makes it possible to test on these pages.
To understand how to install tracking for Google Optimize, and avoid your users seeing a flicker during the testing process, view Seer’s resource on the topic here.
Once your site is set-up to properly utilize Google Optimize, you can then proceed to set up your first A/B test. Let’s walk through an example!
Test Set-Up
The first decision that you’ll need to make for your A/B tests is what page you’ll want to test. The process for deciding this can be aided here, and once you have your test to page, you can start to create your first A/B test.
When you are ready, open your Optimize account, and click Create Experience:

This will then prompt you to name your experience (give it something descriptive but simple), and add in your Editor URL.
The Editor URL is key, because it's the page from which Optimize allows you to make edits on page.
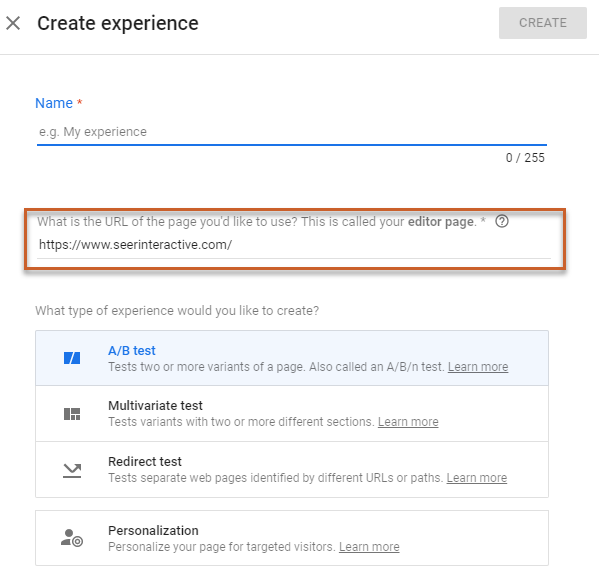
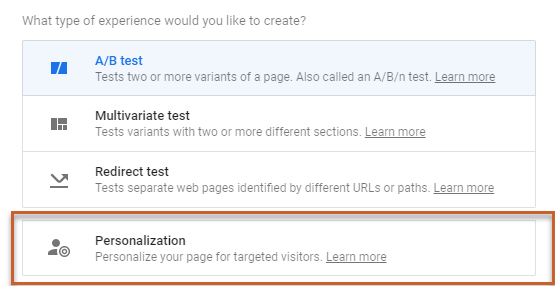
Once you add in this information, and pick your test type (let’s start with A/B - we’ll touch on the other options later), you’ll get your test page, which looks like so:
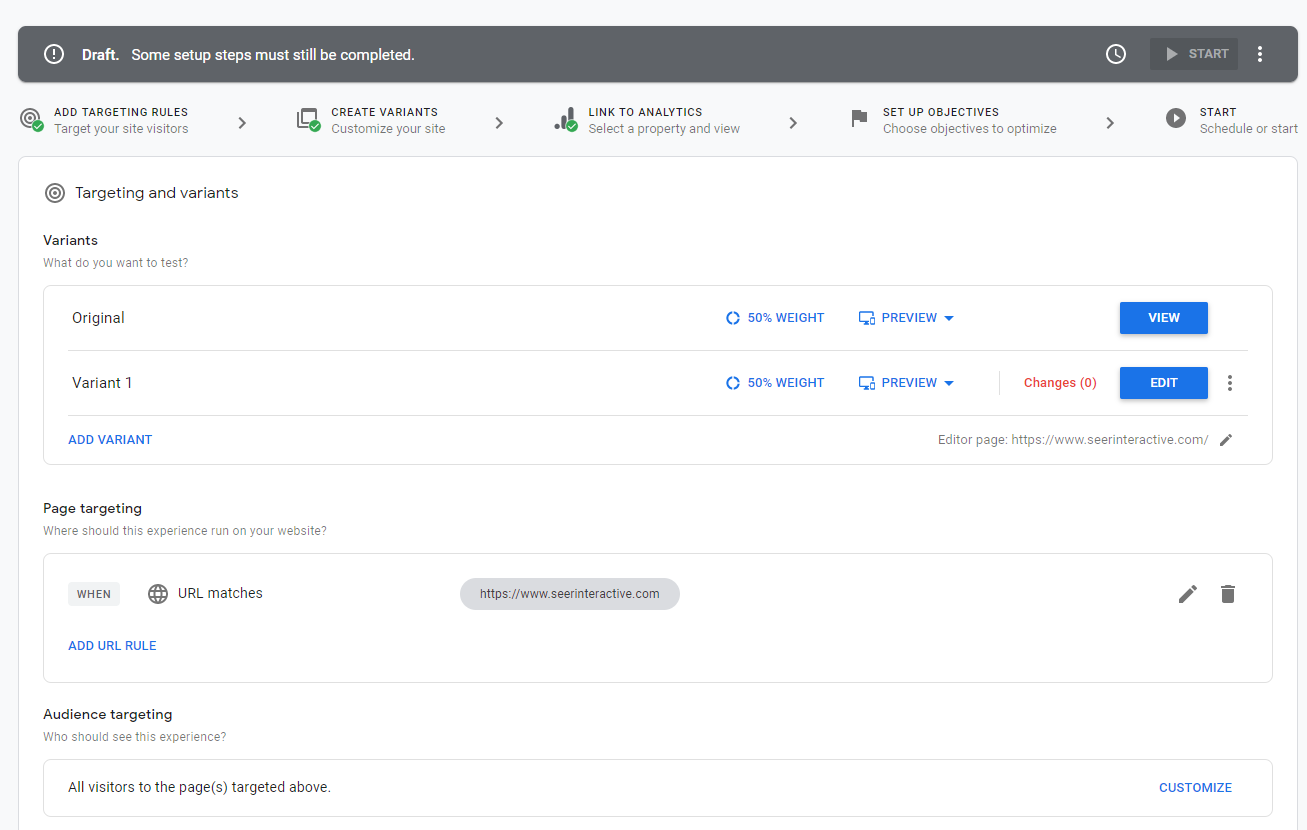
There are a few great things about this view:
- It directly walks you through each step of the testing process.
- It explains what each step is for, and it's intuitive enough to use after just a test or two.
- You can keep things simple for a test, or get complex with your site updates.
Optimize Editor
I want to first walk through one of the best features of Optimize, the Optimize Editor, which allows you to directly make changes to the page that you are testing.
Here are the steps for using the Optimize Editor:
- Create your Variant for your B version of the test.
- Hit the blue Edit button next to your Variant (Variant 1 in this case).
- Assuming your Optimize code is installed correctly, you’ll be ready to edit your page live.
The best part about this process is that making changes is simple! You only need to click (or right-click) on the element on the page, and you can quickly make changes to color, text, and a ton of other items too.
Let’s do an extremely simple example for Seer’s homepage, we'll change the Let’s Talk call-to-action in the hexagon shape below:

By clicking on this element, I select that I want to edit it. By right-clicking on the element, I can make changes to it, like so:
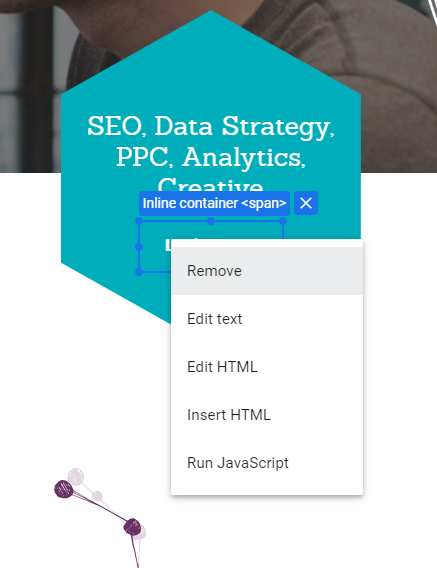
This is super powerful! Updates that previously required developer resources can now be made with a few clicks. In this case, I’ll just change the wording to be a bit more action focused:

That’s it. Just a few clicks, and a change, and I’m ready to test.
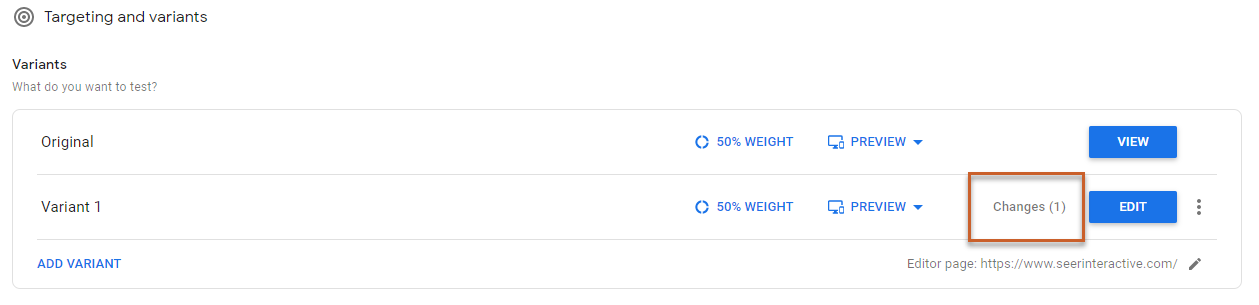
Back to our example - once my changes are ready to go, I’ll Preview them by clicking Save and then Preview reflected up top. I can easily Revert and/or Edit these changes individually or in bulk as I make updates from QA:


While the drag-and-drop user interface (UI) makes testing a lot more simple and easy to use - keep in mind if you have the web design/development chops - you can also make more complex, sophisticated changes (I’ll defer to Google’s great resources here).
Anyway, once you are done with your updates from QA, you can hit the Save button (which will then display as Done). Now that you're ready to publish, go ahead and hit the button again to go back to the Optimize home screen:
🎉Your changes should now be reflected in Optimize - you are ready to move on to the next step.🎉
Let’s set-up how you can target your users overall, with the options below. As a reminder, Google Analytics audiences are an Optimize 360 only feature.
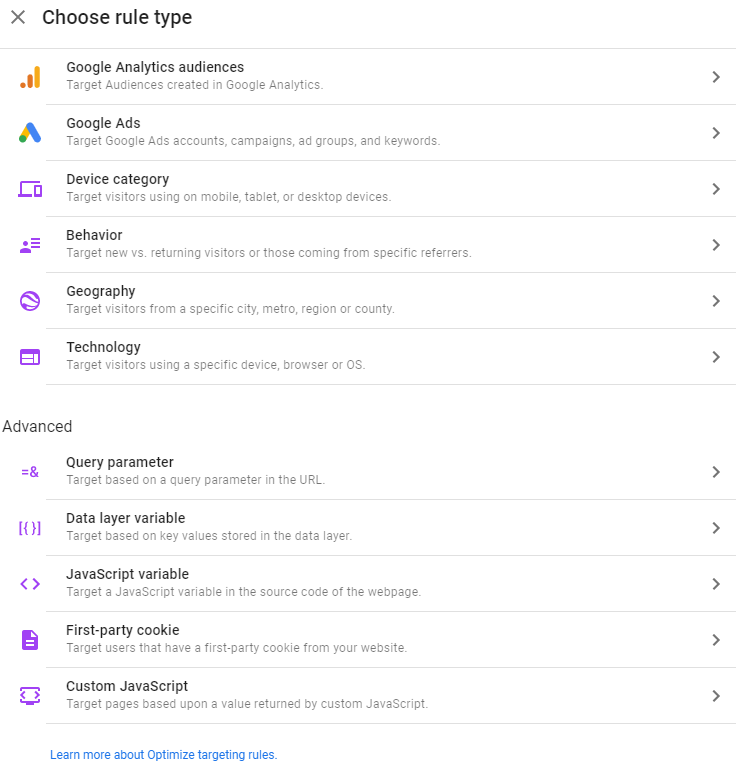
There are a variety of use cases for each of these types of targeting, but remember that each targeting rule you apply cuts down the audience sample size. Whereas just targeting the page overall will enable the largest audience size for testing.
If you are targeting a high-traffic page, this may not be an issue. But for a page without much traffic, layering on targeting can be the difference between needing to wait a few extra weeks to reach statistical significance for your test.
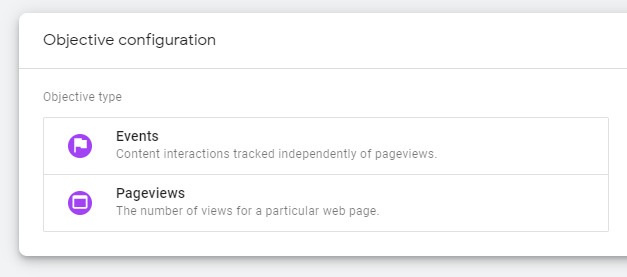
Next, you’ll want to link up your GA view, and choose your objective (what you want to achieve with your test). This is how the winner of the A/B test is determined, so this is a critical decision.
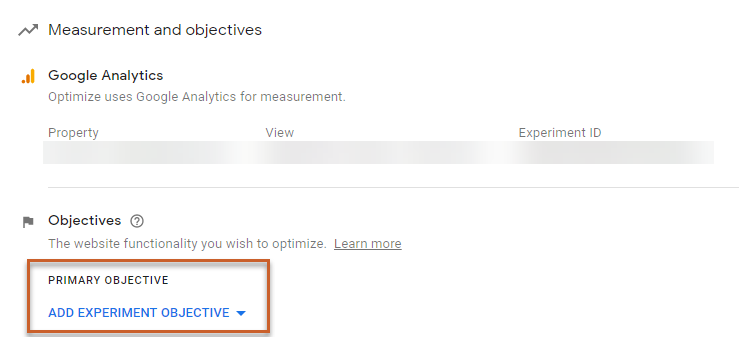
In the case of my example test, the CTA that I changed links to our Contact Us page, so I’d choose a completion of our Contact form as my objective, by using Google’s Choose from list option:
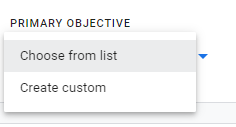

Using the List option (above) you can pick any of your pre-set GA goals or GA’s default objectives (traffic, bounces, revenue if you are an eCommerce company, etc.) listed at the bottom.
Using the Custom option, this gives you a lot of flexibility, as you can choose any event tracking you have to base your objective on. If you aren’t familiar with event tracking, explore GTM’s functionality to set-up some that are relevant to your site’s objectives and audiences:
Do note, although your primary objective is what the success of your test is measured against, you can set-up additional objectives as well (up to 3 with Optimize’s free version).
Once you get through this full process, you can QA your test set-up with a pair of trained eyes and launch.
🎉Congrats, you just completed your first A/B test!🎉
What now? Let’s talk about verifying data once your test is running.
Verify Data
As a first step, you should verify that data is coming in for your test the day after you launch it. Just ensure some traffic is gathering overall - this can be done via Optimize’s reporting tab or via the GA view you linked to (this is my preferred method as I personally find the data easier to understand there).
As a side note, try running your first A/B test super simply on a minor page - just to verify Optimize is working as it should. That way, when you launch your first real test, you can be confident it will gather data as expected. Otherwise, you can also be confident enough to fix any problems that might have caused issues during your first quick test.
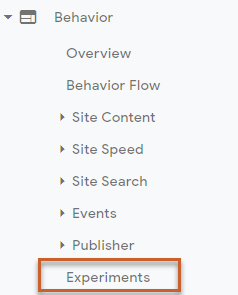
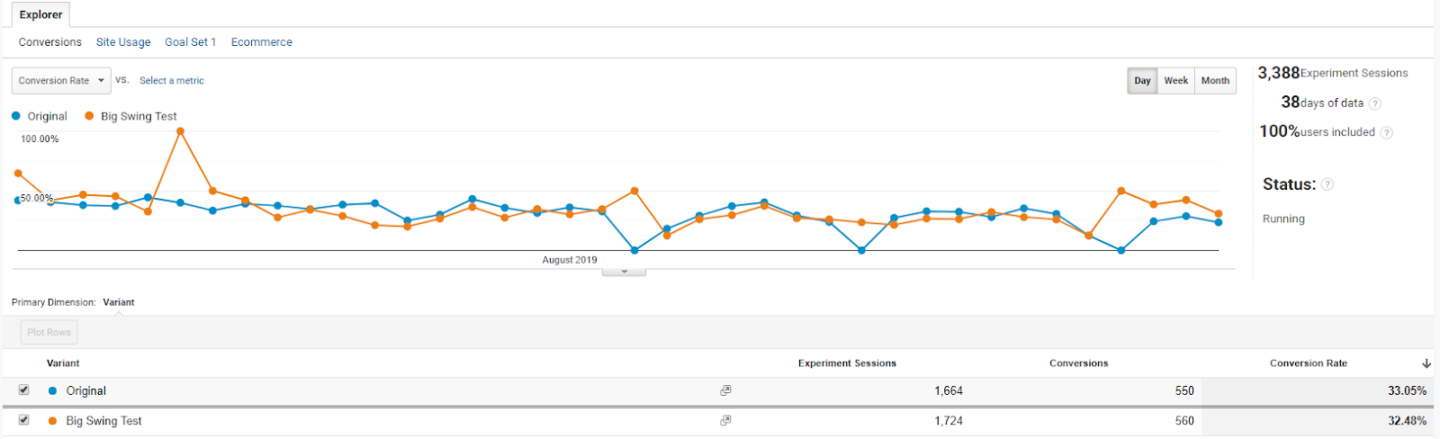
If you follow the GA path of Behavior > Experiments as shown previously (note the call out about the recently deprecated Content Experiments - similar to what you see with the push to Data Studio when viewing Custom Reports or Dashboards), you can see the status of all previous and active A/B tests linked to that view. By clicking on the Experiment Name, you can see the results of the test, and easily see which is winning in terms of your objective.

Ending a Test
The one area that I will differ to Optimize’s reporting over Google Analytics is when determining if your test still needs to run, or if it can be ended.
When you go to the Reporting tab in your Optimize test, you’ll see one of these messages:

This message means that no clear leader has been found and that you need to continue running your test.

If Optimize found a clear leader - congrats! That means that Optimize has determined a winning variant, and you can end your test. Let’s dig into what this means a bit more:

The key terms to understand here are Probability to Beat Baseline and Probability to be Best.
- Probability to Beat Baseline: This is Optimize’s determination of the likelihood that the Control and Variant’s current results are predictive of future results. For example, in the screenshot above, the variant has a 97% likelihood of outperforming the control in the future. If a Variant reaches 95% probability to beat baseline, this means that the test is safe to end as 95% of future results are predicted to yield the same outcome.
- Probability to Be Best: This describes which Variant has the highest likelihood to be the best.
As a rough rule, most tests are going to need to run overall for at least 3-4 weeks. That's really unless the Control or Variant drastically outperforms the other quickly to get significant results, but this can absolutely extend in the following scenarios:
- Low traffic to the test area (overall or because of targeting rules)
- Close results among the control and the variant(s)
Ultimately, as you may see from some screenshots above, Optimize automatically will end a test if it goes to 3 months. In cases where results don’t come quick, it’s important to exhibit patience and let the test run its course to properly gather predictive results.
Let’s say your test is done - what’s next?
Next Steps After Ending a Test
Once your test is completed, you are ready to make a decision about the design, layout, or UX of the page you were testing on.
Say your Variant was a winner, it's safe to roll out the changes to your live Production site (or you can perform further testing to be even more sure). Conversely, if your Control is the winner, then your hypothesis was not represented as true among your websites' audience. In this case, stick with your current page design, and test in another way.
A/B Testlog
It’s important to document your strategy and the results in a Testlog that lives outside of the platform.
Although not exhaustive by an means, here's an example of the type of columns we'd recommend in your A/B Testlog:

- Test Name
- Hypothesis
- Audience
- # of Variations
- Start Date
- End Date
- Duration
- KPIs
Also keep in mind - don’t feel discouraged if your Variant lost and your Control is the clear winner. You still learned what doesn’t work, and testing is ultimately an iterative process. Continue testing and tweaking your pages to improve the UX over time.
Optimize Features
Let’s touch on some of the non A/B testing features that Optimize offers.
Personalization
Personalization can be a great A/B testing next step if you want to further test a winning option before rolling it out to all users. Read my colleague James Corr’s post on personalization in Optimize (it is also a great refresher and reinforcer of a lot of the concepts presented here).
Redirect Testing
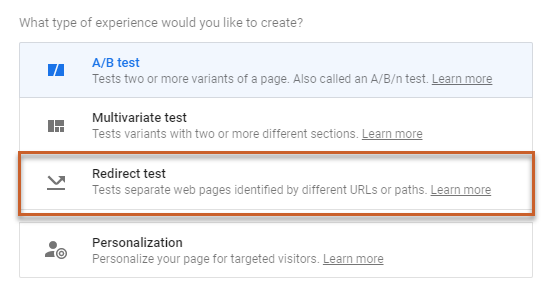
Redirect testing splits the user to another page during the A/B test, which can be useful if you are using Optimize to completely redesign a page rather then just A/B test a specific element. This is useful if you are using a tool like Hotjar to track user experience (UX), as you can add in a specific URL to track user actions on the URL. If you are testing with a single URL, you can use Eivind’s innovative solution detailed here to still track both.
Multivariate Testing
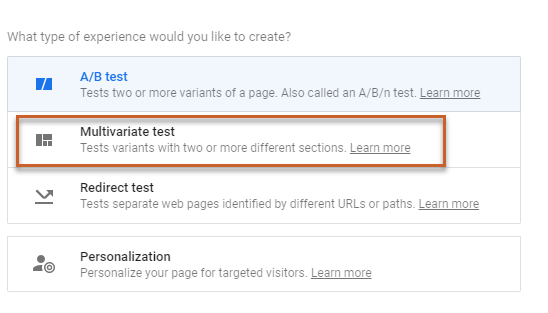
Google’s Multivariate testing allows you to modify multiple areas on a page and test these combinations in tandem. It’s essentially a more complex version of an A/B test with multiple elements on a page, instead of one.
Google Optimize Recap
Now that we’ve walked through Optimize overall, I hope you’ve seen how simple it is to make quick and impactful changes for your site - it’s truly one of the best tools to scale data-driven testing across your site quickly. Feel free to share your hypotheses with me and let me know how your results are going if you end up running tests in Optimize.
Interested in learning how Seer helped a client personalize their user experience in Google Optimize (resulting in users 32X more likely to convert)?
If you want to explore A/B testing at scale, but need assistance, Seer can help guide your A/B testing strategy, and in no time, you’ll B producing better results in A powerful way to your bottom line. Visit our Creative Services page for more information on Conversion Rate Optimization with Seer.


.png)