Google Optimize new feature set, Personalization Experiences, introduces the ability to (yup, you guessed it) personalize your website based on user actions, attributes, and behaviors.
What is “Personalization” in Google Optimize?
Google Optimize is Google’s free testing experiments tool. Historically it offered strictly testing capabilities for doing A/B tests, multivariate tests and redirect tests.
Google recently kicked it up a notch and introduced a new type of experience called “Personalization”. Personalization Experiences give you the ability to alter your website for users based on conditions (like being on Chrome, or a mobile device, landing on a certain page, etc). It’s worth mentioning that this feature is in Beta, but hey so was Google Data Studio until last month.
Before we dive into how to setup a test, here are a few basic business use cases that you can leverage to find success in terms of improving conversions and user experience for the audiences visiting your site.
- Campaign Specific - Running ads on Facebook? Why not match the copy on your site with the specific copy that brought them to the site. Use Personalizations to alter text to match with specific campaigns.
- Location Favoritism - Have various location pages for your business onsite? Use Optimize to alter the experience for a user after they’ve visited the same location page three times to make it easier for them to reach.
- Regional Messaging - If you operate nationally the tone and experience of your site in the Mid-West might be entirely different than the Northeast. Use Personalizations to change verbiage, imagery, etc. based on where a user is physically located.
Experiences in Optimize aims to remove the friction between a winning variant and deploying on the live site to all users by uniting testing with deployment of findings all in one super easy to use free tool.
Interested in results vs how-to implement a Personalized Experience in Google Optimize? Download our case study on how we used personalization to help a client, Baptist Health, drive 32x conversions and users who were 22x more likely to convert.
Creating a Personalization Experience
Assuming you’ve already set up Optimize and connected it to your Google Analytics Account, we’ll get right to setting up the Experience in Optimize.
Setup
Head to the Optimize home and, just like setting up a test, select your Container. Once in the Container, click the “CREATE EXPERIENCE” button at the top right.
This will slide the Experience setup tab into view:

In this tab you’ll name your experience, select the editor page and type of experience. Google defines The Editor page as the web page used to create site changes. In layman's terms it’s the page you want to modify experiences on. Learn more here. Don’t worry though, you can change the Editor page later.
After making the selection on “PERSONALIZATION” you’ll be brought to the Details panel of your experience, which will look like this:
You may have noticed that I’m using Optimize 360, but there’s no difference setting up a test/personalization experience between the two. If you want to know the differences between Optimize and Optimize 360 click here.
This is where the fun really begins! This is where you’ll set up the changes you want to make to your site and when you want these changes to appear on site (the targeting of your changes).
Configuration
Along the right sidebar of the page is where you’ll set and change general settings, such as:
- The name of the test
- Which Google Analytics Property and View to use for reporting
- Toggling email notifications ON/OFF (useful ON if you want to schedule personalizations to run for a certain period of the year or specific event)
Important: We highly recommend selecting a Google Analytics View to send data to! You’ll want to do this because the reporting in Optimize itself is … well … let’s say there’s a lot to look forward to with future improvements (more on this towards the end of the post).
Note: Linking Optimize to Google Analytics sends additional hits to your Analytics property. Be careful that you are not already nearing your hit limit (if you’re a non GA 360 customer).
In the center of the page, click the “MAKE SITE CHANGES” button to use the familiar WYSIWYG Visual Editor in Google Optimize.
Here’s what that looks like if I’m setting up an experience on our Seer Careers page:

For our example I’m going to make a super simple change adjusting our “VIEW OPEN POSITIONS” call to action to “VIEW AVAILABLE POSITIONS”. I did this simply by clicking the text, which prompted the Element menu to appear. I then clicked “EDIT ELEMENT” and finally edited the text.
Visual Editor Options
Beyond editing text (which is pretty self-explanatory), you’ve got other options in the Visual Editor, including but not limited to:
- Remove - removes the element altogether
- Edit HTML - allows you to directly edit the source code of the element (you can replace the element, insert additional HTML, or append to the element)
- Insert HTML - allows you to directly add HTML to the source code (before or after)
- Run Javascript - allows you to add a Javascript function to the element (before or after the closing tag)
Additionally, you can click and drag elements to move them on the page. Be careful when moving elements and when adding code to edit your site.
No matter how big or small, make changes and thoroughly review what they will look like on site using the Device Rendering dropdown at the top of the editor. Today the editor allows you to preview Standard, Nexus 7, iPad, Galaxy S5, Nexus 5X, iPhone 5, iPhone 6, iPhone 6 Plus and Responsive devices.
Targeting
Now that we’ve edited our page to our liking, we’ll head back to the Experience Overview page and set up the targeting.
Targeting is what will cause our experience to display, or not display, for a given user. You can choose simple things like a specific URL (as I did in our example) or a specific city to more advanced things like through a first-party cookie or a data layer variable.
Here’s a break out of all the options you have at your fingertips via Google:
| URL targeting | Target the specific URLs where your experiments run. Learn More. |
| Audience targeting | Target Audiences created in Google Analytics*. Optimize 360 Feature only. Learn More. |
| Behavior targeting | Target new vs. returning visitors or those coming from specific referrers. Learn More. |
| Geo targeting | Target visitors from a specific city, metro, region or county. Learn More. |
| Technology targeting | Target visitors using a specific device, browser or OS. Learn More. |
| JavaScript variable | Target a JavaScript variable in the source code of the webpage. Learn More. |
| First-party cookie | Target users that have a first-party cookie from your website. Learn More. |
| Custom JavaScript | Target pages based upon a value returned by custom JavaScript. Learn More. |
| Query Parameter | Target specific pages and sets of pages. Learn More. |
| Data Layer variable | Target based on key values stored in the data layer. Learn More. |
You can stack your targeting rules as well, meaning that a user needs to match multiple things for the personalization to kick in.
Currently this works using the “AND” operator -- meaning that everything within your targeting conditions needs to be met. This is in contrast to the common “OR” operator -- which would allow you to specify condition 1 OR condition 2, instead of condition 1 AND condition 2. I’m willing to bet this will be a feature soon!
For our example I’m selecting three conditions:
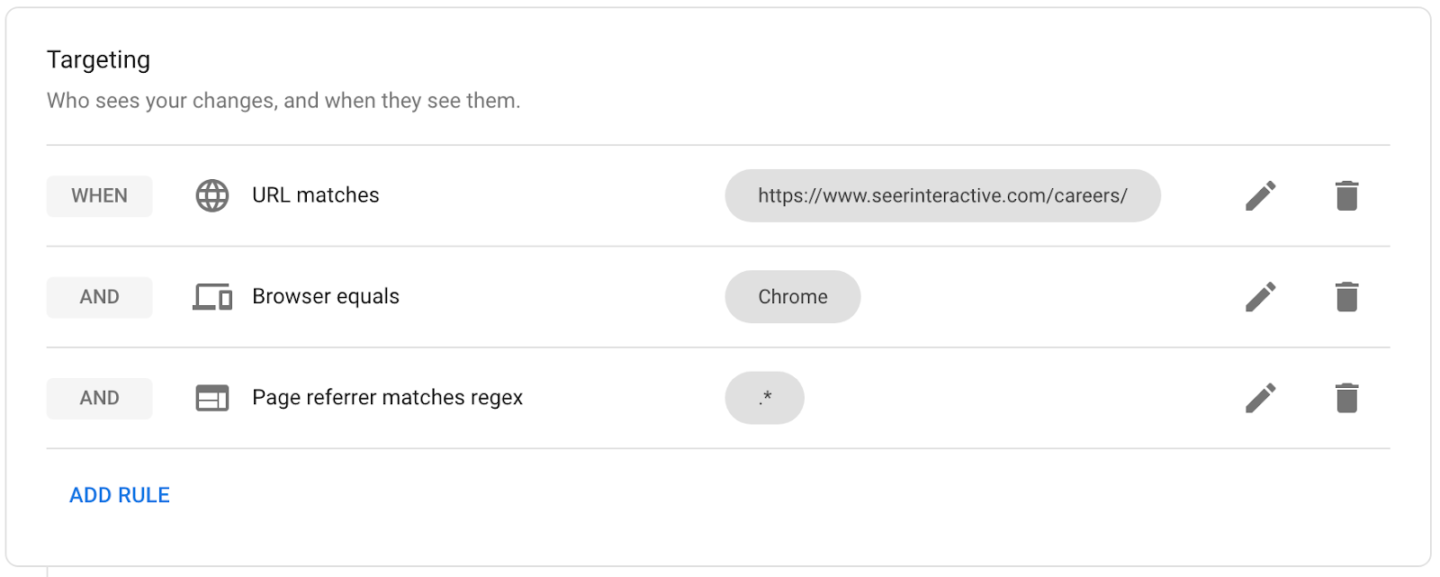
This, again, means that all of these conditions need to be met for the Personalization to run.
Now that we’ve got our targeting setup we’re on to the last step, launching it. You’ll know everything’s ready when you see this:

At this point you’ve got two options:
- Start the experience letting it run to infinity and beyond or until you stop it
- Set a specific schedule (there is a 365 day limit)
After launching, that’s it, your experience has launched! But your job’s not quite done, yet. You’ll need to make sure the experiment page gets traffic and the performance is what you anticipated.
Reporting
The reporting capabilities within Optimize are lacking to say the least, example below:
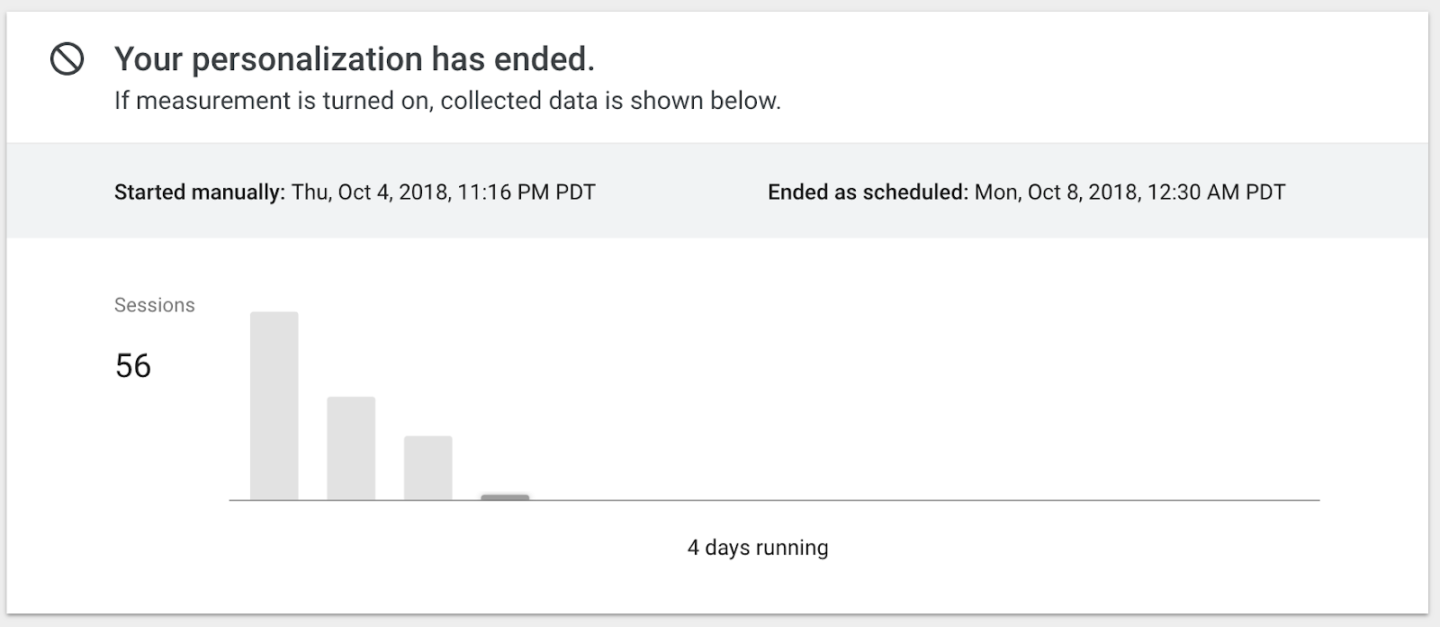
This is precisely why it was so important for you to select a Google Analytics View earlier!
When toggled ON, Optimize will send events to Google Analytics every time someone experiences the Personalization.
The event category will be ‘Google Optimize’ and the associated event action ‘Experiment ID’ (a unique identifier for the given personalization, found where you selected your Google Analytics View).

Using these events you can create advanced segments --- in which have tons of applications -- for analyzing how often someone saw your personalization and how it converts (or doesn’t convert!)

Want an example of how Seer used personalization in Google Optimize to fuel serious results for our client? Read our case study here, or download it directly below.
Limitations of Optimize Free vs Optimize 360
You’re currently limited to 10 Personalization experiences in Optimize.
However, you get unlimited experimentations in Optimize 360. Additionally you can set up Audiences which can then be pushed to Google Ads for targeting ads or alerts within Google Analytics if you are a 360 customer of Optimize.
If Optimize 360 or GA 360 seems like something you’d be interested in, note that Seer is a GA 360 Premium Reseller. Feel free to further!

.png)