If you don’t have organization when working with analytics, you’re gonna have a rough time.
Analytics tracking at its core is largely technical and this can elevate the barrier to entry for those that are unfamiliar. However, tools like Google Tag Manager (GTM), make the tag management process much, much simpler. What once could have been tags sprawled across your website without clear documentation, becomes an organized analytics workflow.
What is GTM and Why Should You Use It?
The simplest way to think of tagging? Website tags send information to accomplish a task.
For analytics tracking, a key example of this is the Google Analytics pageview tag, which you can either directly place on every single page of your website, or use Google Tag Manager to deploy in a more standard fashion. The on-page option can be fine for a while, but what if:
- You want to modify this tag in the future.
- You need to add further Google Analytics event tracking.
- You want to leverage Google Optimize and need to modify your code set-up.
I’m sure you can quickly see how what was simple can become very messy, disorganized, and impossible to keep up with over time. With a Tag Manager solution, there is only ONE set of code that needs to be added to ALL PAGES of your website. The GTM base code never has to be modified. Not only this, but Google Tag Manager also features nuanced permission levels, allowing some users to only view what you have set-up, while others can actually update and publish new versions of tracking via your pre-added GTM code. Don’t worry, we’ll get to that.
Pre-Set Templates for Tags You Use Most
Not only does GTM have pre-set templates for Google Analytics pageview and event tags, but it also hosts a whole myriad of other tag templates. These often make things as simple as entering in an ID, and you are good to go.

And lastly, to summarize, if you are doing absolutely anything in Google Analytics, Google Tag Manager is an absolute must. With so many pre-built features set for Google Analytics, it is actively harder and inefficient NOT to use Google Tag Manager.
What is a ‘Tag’ in GTM?
At the heart of Google Tag Manager, lives the tag, the whole reason we are here.
A tag is preset snippet of code that sends information somewhere else.
Google Tag Manager’s namesake revolves around tags, and it truly makes website tagging less of a hassle. If you think there are elements of your website that you’d like more information on, a good first step is to determine which tags you can use to get that information, and how to set them up.
Using this list of tags, ask yourself which tools your organization is using that may already be supported by Google Tag Manager. Once you’ve got your list of tags to add, you are ready to get started. Let’s take setting up a new Google Analytics pageview tag as the first step.
GTM Tag Example - GA Pageview
So you want to track users in Google Analytics? At the core of all of this is the Google Analytics pageview tag. Let’s follow the steps to create a pageview tag:
- Choose the Universal Analytics GA tag type

- Keep Track Type as Page View
- Create a GA Settings variable using your Tracking ID
- Choose the relevant trigger of when you want this page view to fire - likely All Pages
- Test and QA your set-up in GTM Preview and Debug Mode
- Publish your container
- Voila - you are deploying Google Analytics with GTM!
GTM Tag Example - AdWords Conversion Tracking
So you are running AdWords ads and want to track specific actions. Here’s what you can do in Google Tag Manager:
- Sign in to your AdWords account to gather the values that you will use to complete the tag setup (read Google’s documentation if you can’t find your Conversion ID!)
- Add in the details of the tag itself
- Pick your trigger (maybe a thank you page, a form submission, etc.)

Then follow, the same QA steps as the GA tag (based on your selected trigger), and confirm things are firing and good to go before publishing.
This tag approach can be replicated as many times as you need, and you can also leverage more custom tag set-ups with Custom HTML or Custom Images as well.
Now that you’ve got the concept down, let’s get to the engine of the tag, the trigger.
What is a ‘Trigger’ in GTM?
A trigger determines when (or when not) a tag fires (and sends information).
GTM features four primary types of triggers:
- Page View (related to the page loading itself)
- Click (related to a specific user click on the site)
- User Engagement (related to user interactions)
- Other (catch-all for items not in the top 3)

Since your triggers drive when your tags send (or do not send) information, it is important to understand the two main trigger types: firing triggers and blocking triggers.
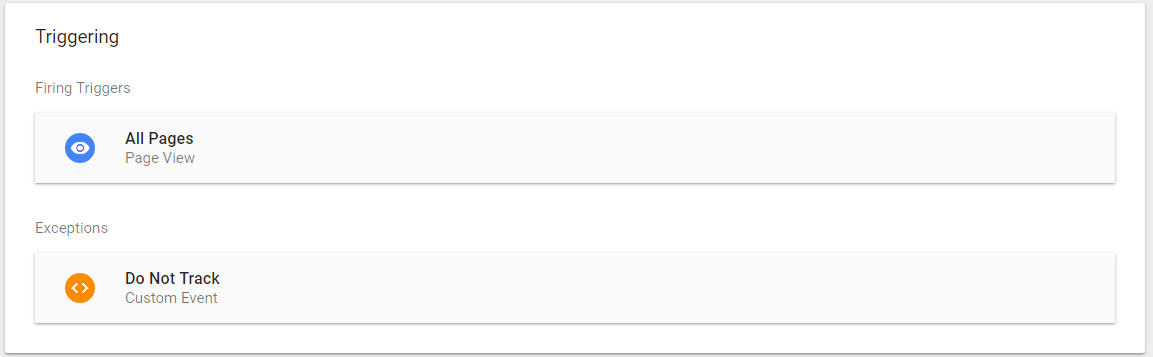
Firing Trigger vs. Blocking Trigger
A firing trigger largely does what you’d imagine it does, it tells your tag when to “fire” and send information (whether that to be to Google Analytics, AdWords, your site itself, etc.). This could be as simple as firing on All Pages with GTM present, or as particular as only on a specific link click on your site.
You can have multiple firing triggers on a single tag, and Google Tag Manager requires that one trigger is met in order to fire the tag. An example of when you might use this would be if you want to fire something based on a Timer (say after 30 seconds on a page), but also if a certain element of a page is visible (the Element Visibility trigger). This is not to be confused with the elements of an individual trigger itself, which need all specifications to occur (this uses the AND rule, not the OR rule used above) for the trigger to fire.
A blocking trigger (sometimes displayed in GTM as an Exception) takes the opposite approach, and instructs your tag when NOT to fire. Examples of when you would want to use this could be as follows:
- NOT TO FIRE when users who opt to not be tracked.
- NOT TO FIRE an external link click event on social profile event tracking
- NOT TO FIRE for internal users who navigate to your intranet from the main site
Ultimately, triggers are most easily thought of in relation to tags. The process is as follows:
- If a firing trigger is met, the tag is fired, unless…
- A blocking trigger is also met, in which case the tag will not be fired
So, now you know how to create a tag and how to trigger it. What are variables in GTM, and why are they important?
What is a ‘Variable’ in GTM?
A variable captures information on-page and allows you to use this information for other means (sending in a tag, using in a trigger, etc.).
Variables are sort of the black box of GTM, and the least often understood item in GTM. Let’s rectify that.
Variables come in two kinds: built-in variables and user-defined variables, but they both function in the same way. Variables allow you to pass information somewhere else for usage in GTM. Let’s dig into some examples of each.
{X}
Built-In Variables
GTM comes with some variables pre-built (how nice of them!), of which here is the exhaustive list. Let’s break down a few specifically to make it simpler:
- Click Classes: This is the on-page class that your click takes place in. Could be used to capture clicks only in a specific section of the site.
- Click URL: This is the URL that the user clicks on via the site. Could be used to capture only social profile clicks, external links clicks (clicks off of your site), etc.
- Page URL: This is the URL of the page on which the pageview/interaction takes place. Could be used to trigger a tag only on a thank you page, a certain site section, etc.
One minor caveat is that GTM by default does not enable all built-in variables, so this is an action item I’d recommend doing, as there are built-in variables in this area now that account for interactions with videos, scrolling on pages, visibility of items on page, etc. In this case, built-in does not equal simple, so take advantage of the great stuff that GTM has ready to go for you.
User-Defined Variables
This is where things can get a bit more complicated. User-defined variables allow you to create your own variables, in many different variations. A whole post could be devoted just to these variable types, but I’ll highlight a key few:
- Data Layer Variable - This is used to capture information in the data layer, a way to get around information that is not on the page itself.
- Custom JavaScript - Allows you to pull in information using your own JavaScript set-up.
- Element Visibility - Want to fire a tag when an item on page is visible? This is your variable type to use.
- Constant - This is a great variable to use if you know that you will need to reference something in the future. An example of this could be specific site domains, a list of items, etc.
- Lookup Table - This takes Constant to the next level, and creates a table where it’ll match an Input in the table to the Output. An example of this could be matching acronym codes passed to the data layer to a more specific site section.
- Google Analytics Settings - This is a must if you are doing Google Analytics tracking. It allows you to add in information for your property ID, fields to set, custom dimensions, etc. and easily reference via all GA tags.

User-defined variables are definitely not a beginner area for most GTM users, and should be approached and learned step-by-step based on each variable type. So, you now know the core three elements in GTM: tags, triggers, and variables. Let’s cover a few more topics before we get things set-up on your end for GTM.
What is a ‘Workspace’ in GTM?
A workspace is a siloed GTM section that allows you to make updates while not impacting the changes of others in GTM.
Do you work in an organization in which multiple people (or vendors) would need access to your tagging set-up? If so, GTM workspaces are just what you are looking for. This set-up would be most useful in a situation like below:
- One person is updating GA event tracking via GTM
- Another person is updating conversion tracking for social areas in GTM
- Yet another person is migrating on-page tags to custom HTML tags in GTM.
Unless it is a case where one person is doing all of these tasks, you’ll want to split these out based on workspaces. GTM provides 3 workspaces for all free accounts of GTM.
Workspaces also serve to ensure that tracking that isn’t ready isn’t accidently published, and that multiple users aren’t changing the same item. Once a workspace is published, users in other workspaces can then update their workspace to include these GTM changes. But, before we get to publish, let’s understand how to preview changes first.
GTM Preview vs Publish
GTM updates should never be published (i.e. pushed live to where tracking is running) without first previewing. Publishing updates without first thoroughly QA’ing the changes is asking for tracking disaster.
Luckily for everyone, GTM has a pre-built feature to allow for easy testing of new tracking. That feature is GTM preview. GTM Preview Mode allows you to locally (i.e. just on the browser where the link is used) share the update that your GTM changes would have and test these changes. Let’s start with the GTM preview link.
GTM Preview Link
Whenever you add changes to GTM, you can click Preview (in the top right hand corner), and this will generate a unique link to share:

Once you receive that link, you can do the following process:
- Open an Incognito window in your browser of choice (GTM sets this preview link at the browser level, so it is easiest to have it siloed to incognito)
- Load the site with your GTM container
- You should get a pop-up at the bottom of the page that will track tags fired, triggers used, variables loaded for each action as you progress on the site.

This will give you a clear idea on how (if) your tracking is working, and allow you to fix any issues, or confirm any tracking. Once you feel comfortable with your tracking, it’s on to the publishing process.
GTM Publish Process
Once you are ready to publish, click the Submit button from the image above.
The key aspect of this process is to ensure that you are being descriptive in the Version Name and Version Description that you create. I can’t tell you how many times I’ve had to go back and check previous versions of GTM, and how much extra detail in these situations has been a sanity saver.
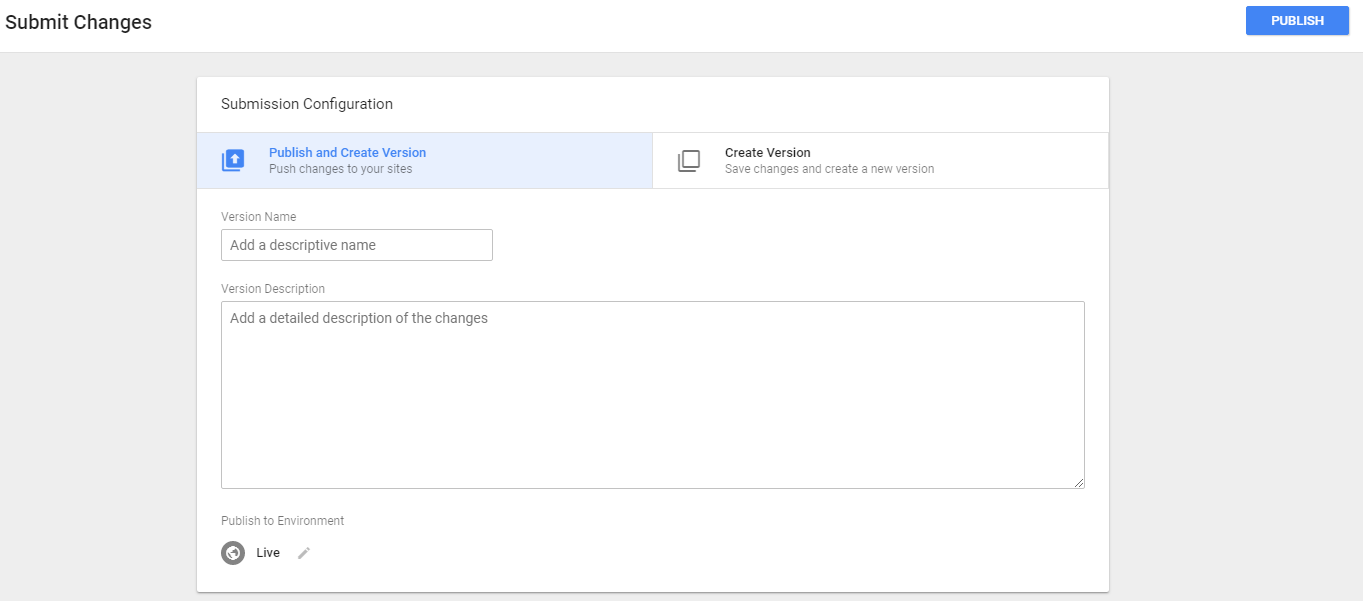
Once you are fully documented, click Publish in the top right, and then your tracking is live. It’s always a good idea to do a second QA post-publishing to ensure everything went as planned. But, in the worst case scenario where something is wrong, that’s where GTM versions have got your back.
What is a ‘Version’ in GTM?
If, for whatever reason, you ever need to republish an old container (i.e. remove the changes from your published version), you can do this, by going to the Versions section of GTM, finding the Version you want to “roll back” to, and then clicks Actions > Publish.
So, at this point, you are getting the hang of GTM. You know the three core items (tags, triggers, variables), and understand how to preview, publish, and use prior versions.
Let’s get GTM up on your site!
How to Install Google Tag Manager
1) Create a GTM Account
- Visit the GTM site and sign-up
- Create your GTM account
- Create a Container (this post primarily focuses on web containers, but you can also do mobile or AMP containers as well) and assign roles in Account > User Management
- Create your initial tags, triggers and variables (remember - it’s best to start out with the GA pageview tag, as well as any relevant advertising tags like AdWords, Bing, etc.)
2) Installing the GTM Tracking Code
GTM needs to be added to every page of the site of which you want to track. Once you’ve created your container, you simply want to go to Admin > Install Google Tag Manager and grab your code. Example below:

- Add the GTM tracking code to your site when prompted
- Preview & Publish your initial version of GTM
- QA your new tracking environment
Once this is installed on your site, you can use GTM Preview Mode to confirm it is functioning as intended, and then publish your initial version of GTM (no tracking starts until you publish your initial version).
So, What ‘Tags, Triggers and Variables’ Will You Create?
If you need assistance with GTM set-up, strategy, etc., Seer is a certified partner in both Google Tag Manager and Google Analytics. We can help make your tagging organized and ensure that your analytics is the solid foundation that it should be. Just contact us or keep reading our tips and resources to learn more.