Finding a simple, more time-effective solution for dayparting analysis is my personal white whale. Dayparting analysis and implementation always struck me as being unnecessarily complicated and time consuming, so I’ve continued to look for ways to make the task easier for myself, the Seer PPC team, and other PPC marketers.
A few months ago, I developed a new approach to dayparting that makes the analysis component of dayparting a bit more bearable. To learn more about the background of this technique, check out my blog post on the Acquisio Blog. I’m now pleased to share a solution to the second component of PPC dayparting - implementation. I’ve created a template that takes new & existing modifier recommendations for hour & day and then formats it for easy upload using AdWords Editor.
A Two Hour Task - Now Takes 30 Minutes
With this method, I’ve reduced a task that historically has taken two hours to finish to now only needing a mere 30 minutes to complete. This not only allows us as PPC marketers to spend time on other analyses and optimizations, but it makes it more feasible to implement dayparting adjustments more often -- say, for in-season modifiers vs. off-season modifiers.

The template is set-up so that 13 campaigns can be analyzed/modified at a time, so keep that in mind when preparing your analysis. To analyze more than 13 campaigns, I’d recommend splitting your campaigns across multiple instances within the template rather than trying to expand it.
Read on to learn how to save hours on dayparting implementation by using the template for your own PPC campaigns.
How to format daily findings to fit within the template
From your raw data file, set up a pivot and ensure the data matches this order:

- Be sure to pay close attention to the order of the days of the week – make sure they’re arranged Sunday-Saturday.
- Paste the results of the pivot chart to another sheet & insert blank lines between each campaign
- Paste the spaced-out data into the “Daily Findings” tab in the Auto-Template.
How to format hourly findings to fit within the template
Please note, the template is set-up to leverage exactly 4 time-periods and will not work for any more or less. From your raw data file, set up a pivot and ensure the data matches this order:

- Be sure to arrange your time-periods in the correct order from earliest to latest
- Paste the results of the pivot in another sheet & insert blank lines between each campaign
- Paste the spaced-out data into the “Hourly Findings” tab in the Auto-Template.
How to define your time periods
I recommend grouping into hours that make sense for your business, perhaps based around call center hours or store hours
On the “Hourly Findings” tab, define your time-periods in cells P4-P7: 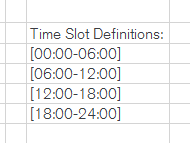
- Ensure you follow this format exactly: [HH:MM-HH:MM]
- And, again, make sure you arrange your time-periods from earliest to latest.
How to fill in existing & recommended bid modifications
Whether you’re using this template solely for implementation or to present your analysis, here’s where you will enter existing and new bid modifiers.
On both the Daily & Hourly tabs, fill in columns L and M with bid modifiers:

- Column L should contain the bid modifier currently applied, if applicable.
- Column M should contain the new modifier that you’d like to apply to a given day/time.
- Note if there is no existing modification and/or no new modification is being recommended to a given day/time, just leave the cell blank.
How to load into Editor and upload to AdWords
At this point, check and double-check your recommendations and settings from the previous steps. Now it’s time to convert that hard work into an easily-implemented upload for AdWords Editor.
- On the “Editor Upload” tab, you’ll find a column for each campaign and a long string for the ad schedule:
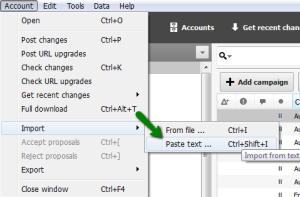
- Copy these columns to clipboard and then open up AdWords Editor.
- In Editor, go to Account > Import > Paste Text:
Then paste in the data from the Auto-Template:
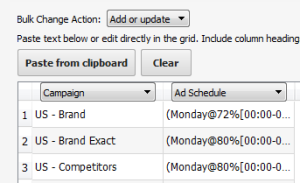
Click process, and the new dayparting settings will be brought into Editor
- Note: You won’t actually be able to see the changes within Editor, but when you post changes, you’ll be able to see the new dayparting within the interface.
- Additional Note: When new settings are posted to AdWords, the previous settings are over-written completely, so it’s vital to ensure that existing adjustments are accounted for.
This template can be used simply for implementation, or it can be used as a formal and final deliverable. If you choose to use it as a deliverable, which is advised, as it makes implementation that much easier/faster later on, use the tab “Recommendations Summary” to summarize your recommended changes to your internal marketing team or PPC client.
This is considered a v.1.0 template. I am continuing to improve it by expanding the number of campaigns in a single template so that it can handle an even larger range of time slots.
Have any additional questions about the template or PPC Dayparting? Send a tweet to @lokiducks!